

How to read the wear pattern, decide when to intervene, and carry out a relining that lasts
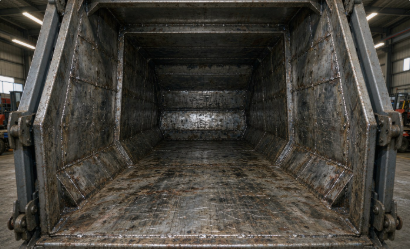
The body of a rear loader is a pressure vessel that also happens to be a wear surface. Every load is dragged across the floor by the packer plate, compacted against the front wall, and pushed out again by the ejector. Over a few years that grinds the liner plates thinner, and eventually through. Relining is one of the larger mid-life repairs on this type of vehicle, and it is also one of the easiest to get wrong, because the visible hole is rarely the whole problem.
This piece covers where liners wear and why, the thresholds worth acting on, how a relining job is actually sequenced, and what material choices are available. It is written for municipal procurement teams, sanitation and fire service administrators, construction contractors, fleet managers running their own special-purpose vehicles, and the maintenance leads who plan the work. CRRC Vehicles covers rail transit, smart mobility, new energy vehicles and special-purpose vehicles, and the wear rates below are typical field values rather than laboratory results.
Why wear concentrates where it does
Wear is not evenly distributed, and the pattern is diagnostic. The floor directly in front of the hopper takes the impact of every load as the packer pushes material forward, so it wears fastest. The lower third of the side walls carries the lateral component of compaction pressure plus abrasion from material sliding along them. The upper walls and roof barely wear at all. The tailgate inner face takes a moderate amount from the last of each load and from material sitting against it between stops.
Typical liner wear rate by location (mm per year, mixed household waste)
Take those rates as a planning input rather than a measurement. A body floor starting at 4 mm losing 1.6 mm a year reaches a practical intervention point in under three years, which matches what most fleets see on high-cycle urban rounds. The same body on a light rural round can go twice as long. Route intensity, not vehicle age, is the variable that matters.
Reading the wear pattern
| Wear pattern | Where it appears | Usual driver | What it needs |
|---|---|---|---|
| Even thinning across a wide area | Full length of the floor | Normal abrasive wear from material movement | Monitor against thickness threshold, plan full panel replacement |
| Localised perforation | Impact zone ahead of the hopper | Material drop height and hard or sharp items | Local patch or full floor section, depending on extent |
| Cracked weld seams | Joints between liner panels | Vibration plus welding residual stress | Re-weld and add backing strips to spread load |
| Bulging or distortion | Lower side walls | Lateral component of compaction pressure | Realign, then fit thicker liner in the affected bay |
| Pitting and pinhole corrosion | Low spots where liquid collects | Leachate sitting against the steel | Panel replacement plus drainage improvement |
| Guide rail and slider wear | Roof or side rails carrying the ejector | Ejector tracking under off-centre loads | Replace rail strips, check ejector alignment |
The single most useful habit is to photograph the floor at every major service interval. A set of dated images turns “is it getting worse” into something you can actually answer, and it also settles arguments about whether a failure was sudden or long in coming.
When to intervene
Three thresholds are worth writing into the maintenance plan:
- 50 percent of original thickness: schedule the work. Do not wait for a hole, because planning a relining is far cheaper than reacting to one.
- Any through-penetration: the truck comes off the road until it is repaired. Leachate escaping through a perforated floor is a compliance issue as well as a structural one.
- Cracked seams over 150 mm: weld repair promptly, because a seam crack lets material behind the liner and accelerates everything else.
Relining, step by step
The sequence matters more than the welding skill. Skipping the early steps is why some relined bodies wear through again in half the expected time:
- Empty, wash and dry the body: including behind the tailgate seal. Relining over residue traps moisture against the new steel.
- Survey and measure: ultrasonic thickness readings on a grid, plus photographs. Mark every area below threshold.
- Strip the worn panels: cut out the affected sections, taking care not to damage the structural frame underneath.
- Inspect and repair the substrate: this is the step that gets skipped. Check the frame rails and cross members for corrosion and cracking and repair them before any new liner goes on.
- Prepare the material: cut new plate to size, bevel the edges, and match the specification to the wear zone rather than using one thickness throughout.
- Weld with a controlled sequence: stitch and alternate to control heat input and distortion. Continuous runs along one seam are what bow the panel.
- Address drainage: confirm drain holes are clear and consider adding them at low points, since standing leachate is the main corrosion driver.
- Inspect welds and coat: check for penetration and undercut, then apply the protective coating system the body manufacturer specifies.
- Re-fit and test the mechanism: run the packer and ejector through full cycles empty, watching for contact, noise or tracking drift.
- Record the baseline: note the date, the areas renewed and the new plate thickness, so the next survey has something to compare against.
Step four is worth repeating, because it determines whether the job lasts. New plate welded onto a corroded frame looks fine on handover and fails early, and nobody can tell the difference from outside once the job is painted.
Choosing the material
- Mild steel, 4 to 5 mm: the default. Cheap, weldable, and predictable. Replaced more often, but straightforward for any workshop.
- Hardox or equivalent abrasion-resistant steel, 3 to 4 mm: two to three times the service life for a modest cost increase. Needs correct welding procedure, and it is less forgiving of poor fit-up.
- Stainless floor sections: good corrosion resistance where leachate sits, materially more expensive, and the weld procedure matters a great deal.
- Polymer or composite liner panels: light and corrosion-proof, and they reduce body weight. Mechanically fixed rather than welded, sensitive to impact damage, and not a universal fit.
- Zoned specification: the pragmatic answer. Abrasion-resistant plate in the impact zone ahead of the hopper, standard plate elsewhere. Most of the life benefit at a fraction of the cost.
Frequently asked questions
How thin is too thin for a compactor floor?
Treat 50 percent of original thickness as the planning trigger and any through-penetration as an immediate stop. On a body that started at 4 mm, that means scheduling work at around 2 mm rather than waiting for a hole. Fleets that plan to the half-thickness point spend less overall, because they avoid emergency repair and the compliance exposure that comes with leaking leachate.
Can I replace only the damaged panel?
Yes, provided the surrounding plate is sound and the substrate underneath is clean. Local patching is the right answer for a single perforation on an otherwise healthy floor. If wear is general across more than about a third of the floor area, a full relining is more economical than chasing patches, and it avoids the weak seams that accumulate between them.
Is abrasion-resistant plate worth the extra cost?
Usually yes in the impact zone directly ahead of the hopper, where wear rate is roughly double the floor average. Applying it across the whole body is harder to justify on cost. A zoned specification, hard plate where the packer pushes and standard plate elsewhere, gives most of the benefit for much less money.
How long does a relining take?
A full floor relining typically takes three to five workshop days including stripping, substrate repair, welding and coating. A local patch can often be turned around in a day. The variable that blows the schedule is usually substrate corrosion discovered after stripping, which is why survey quality before the job matters so much.
What actually extends liner life?
Three things, in order of effect: keep the body drained so leachate does not sit against the steel, keep the packer and ejector tracking correctly so material is not dragged off-centre, and match plate specification to the wear zone rather than using one thickness throughout. Operator training on hopper loading helps too, but drainage and tracking are the big two.
Plan it, do not react to it
Liner wear is slow, visible and entirely predictable, which is what makes it cheap to manage and expensive to ignore. Measure thickness on a schedule, photograph the floor, and book the relining when the numbers say to rather than when a hole appears. Doing the substrate properly when the job comes round is what turns a three-year repair into a six-year one, and it costs almost nothing extra at the time.
CRRC Vehicles is a consulting and industry insight team focused on the global mobility and vehicle sector, covering rail transit, smart mobility, new energy vehicles, special-purpose vehicles and emerging transport technologies. We publish ongoing analysis of special-purpose vehicle maintenance practice, materials selection and fleet economics. More detail is available at crrcvehicles.com.