

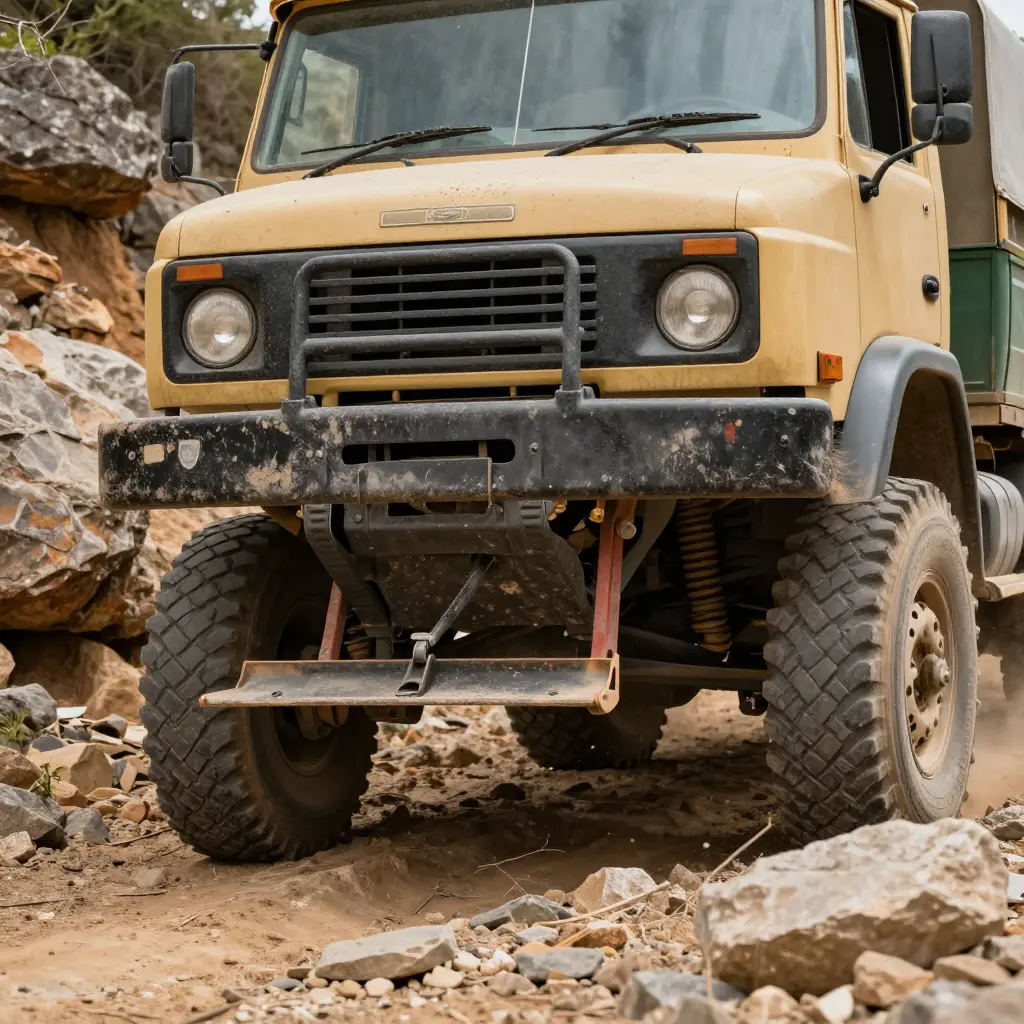
Start With the Number That Actually Predicts Failure
Ask most buyers what tells them a used brush truck is sound and they will point at the odometer and the hour meter. Both numbers sit on the spec sheet, both are easy to argue over at the tailgate, and neither one says whether the truck will still be answering calls after five seasons of fire roads.
What decides that is how the skid unit is mounted, not how far the truck has driven. A pump, tank, and hose bed form a heavy structural payload, and the brackets, subframe, and fasteners carrying it absorb loads no mileage counter will ever record. Two trucks with identical hours can differ by tens of thousands of dollars in remaining service life on the strength of how that load was attached.
What follows covers what the mounting consists of and how it is engineered, why rough ground finds weak mounting faster than highway duty does, and how to judge it during a pre-purchase walkaround.
Rough Terrain Is a Load Test, Not a Drive
A highway mile is gentle. A graded fire road is a repeated impact event: washboard, embedded rock, off-camber turns, and drainage crossings that send vertical shock through the frame dozens of times per minute. Fatigue damage accrues at the joints, not on the gauge cluster.
Weak mounting fails at the interfaces first. Fasteners elongate or pull through, frame brackets crack at weld toes, subframe rails fatigue and split, and the tank begins to shift against its cradle. By the time a driver notices pump misalignment or a weeping tank seam, the damage path is usually a year old.
That is why fleet managers who have bought enough of these trucks look at mounting photographs before they look at service records. Hours describe how long an engine ran; mounting describes how much abuse the chassis actually took.
How a Skid Unit Actually Meets the Frame
A skid unit is a self-contained package: pump, tank, plumbing, hose bed, and often the pump controls, all built on its own rails. That package is then fastened to the chassis at a surprisingly small number of points. Four, six, sometimes eight.
Every gallon of water, every pump start, every firefighter pulling hose off the bed pushes its load through those few connections and into the frame. An odometer counts miles. The mounting tells you how many load cycles the frame has absorbed.
Where the force actually goes
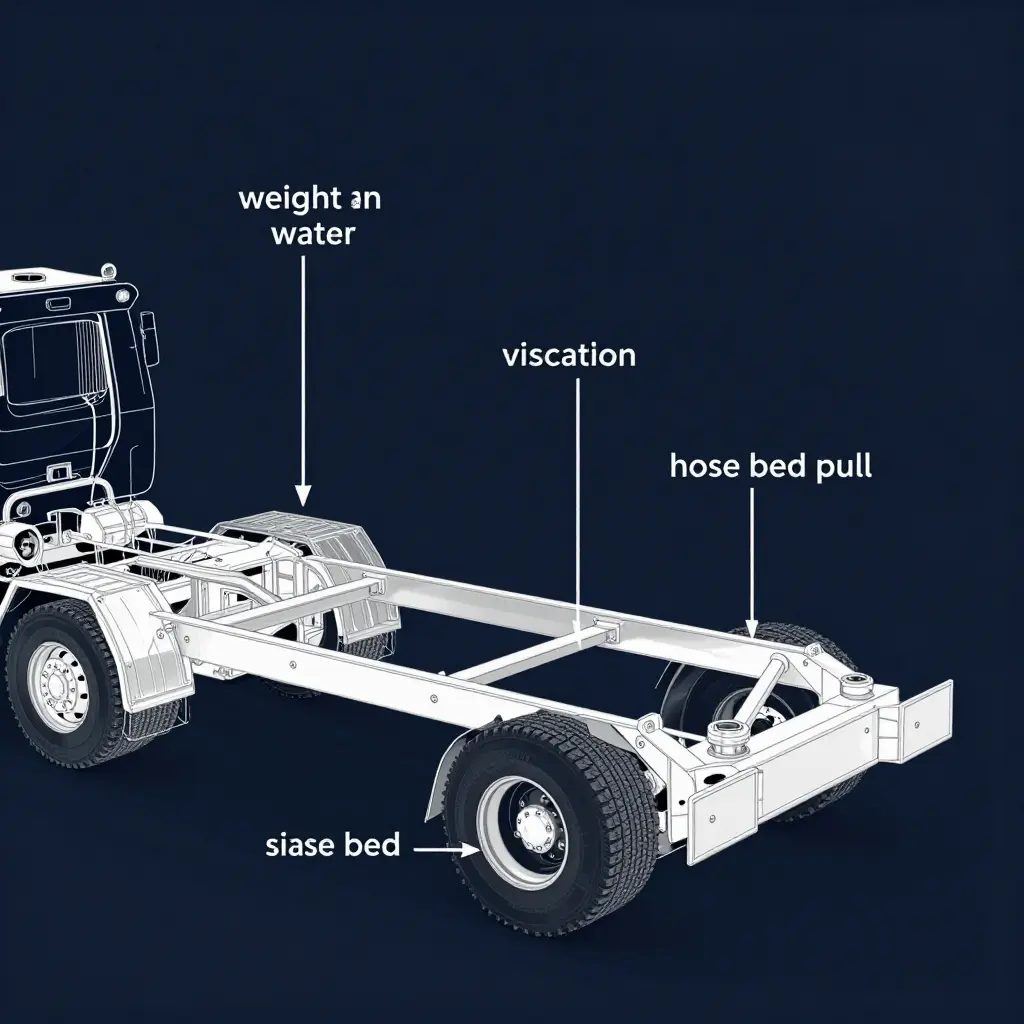
The skid has three load sources and one exit.
- The tank delivers a large, steady downward mass, concentrated at its saddles, and it sloshes, so the load shifts fore, aft, and sideways on every turn and every off-camber crossing.
- The pump adds torque reaction when it engages, plus a high-frequency vibration that never fully stops while the engine runs.
- The hose bed is a lever. A crew pulling a charged line generates a pull and a moment at the rear of the skid that tries to lift the front mounts.
All of it converges at the mounts and passes from there into the frame rail web and flanges. Follow that path once and the underside of a used rig stops being a hunt for rust and starts reading as a record of use.
The three mounting families you will encounter
1. Direct bolt-through to the frame rails. The skid rails sit on or beside the frame and are clamped by bolts, typically through the flange or an existing bracket hole.
The joint holds mostly by friction created through fastener preload, the clamp force the tightened bolt generates. Weight travels straight down into the rail, a short and efficient path. Stress concentrates at the bolt holes, which act as stress risers in a member that is already carrying bending load, and at any hole drilled through the flange.
2. An intermediate subframe or adapter cradle. A second, lighter structure is bolted between skid and chassis, usually with added crossmembers.
This spreads the load over a longer span and hands it to the frame at more points, which is what you want when the tank is full and the terrain is bad. The trade-off is a stiffness discontinuity: the subframe is stiff, the frame flexes, and the transition between them becomes a hard point where cracks like to begin. Watch the subframe-to-frame fasteners and the ends of the subframe.
3. Isolated mounts with elastomer bushings. Rubber or urethane bushings sit between skid and frame, decoupling pump and road vibration from the chassis.
This is kinder to the equipment, but isolation changes the load case. Some of the downward load converts into tension on the bolt, so a compressed, cracked, or oil-soaked bushing quietly removes preload and lets the assembly pound. It also means the skid must be stiff enough to resist torsional flex on its own, because the frame is no longer helping.
One variant crosses all three: welded-on brackets. Welding is compact and strong, but the heat-affected zone beside a weld toe is a classic fatigue initiation site, especially when a bracket is welded across a frame flange. Any weld on a chassis rail deserves a close look for cracks radiating from the toe.
| Mounting family | Main load path | Where stress concentrates | What to look for |
|---|---|---|---|
| Direct bolt-through | Skid rail to frame flange, friction plus bolt shear | Bolt holes, flange edges | Elongated holes, shiny rub marks, loose or missing hardware |
| Subframe or cradle | Skid to subframe to multiple frame points | Ends of subframe, stiffness transitions | Cracks near subframe terminations, loose fasteners |
| Elastomer isolated | Bolt in tension through bushing to frame | Bushing faces, bolt shank | Crushed or oil-soaked bushings, gaps, pounding marks |
| Welded brackets | Weld to rail, then into the frame | Weld toe, heat-affected zone | Cracks radiating from weld toes, paint cracking |
The vocabulary that makes an inspection report readable
The frame rail flange is the horizontal lip of a C-channel. It carries bending, so a hole or notch there costs more strength than the same hole in the vertical web. Crossmembers tie the two rails together and stop the frame from parallelogramming.
Torsional flex is the twist a ladder frame sees when one front wheel climbs a rock and the other stays low. Rigid mounts force the skid to twist with the frame; a stiff tank resists, so the mounting and the tank seams absorb the difference. On washboard ranch roads this happens thousands of times a day at low amplitude, fatigue cycles that add up without ever bending anything visibly.
Fastener preload is the quiet one. Bolts hold by clamping, not by shear strength. Once preload is gone the joint slips, the holes wallow, and the assembly works itself loose.
Put a light under the mounting points before you look at the odometer. Rust scale cracking around a bolt head, a bushing squeezed flat, a weld toe with a hairline running out of it: those are the receipts for every rough mile the rig has already survived. Mounting is not cosmetic detail. It is the record of how the truck has been treated, written into the frame.
Reading the Diagram
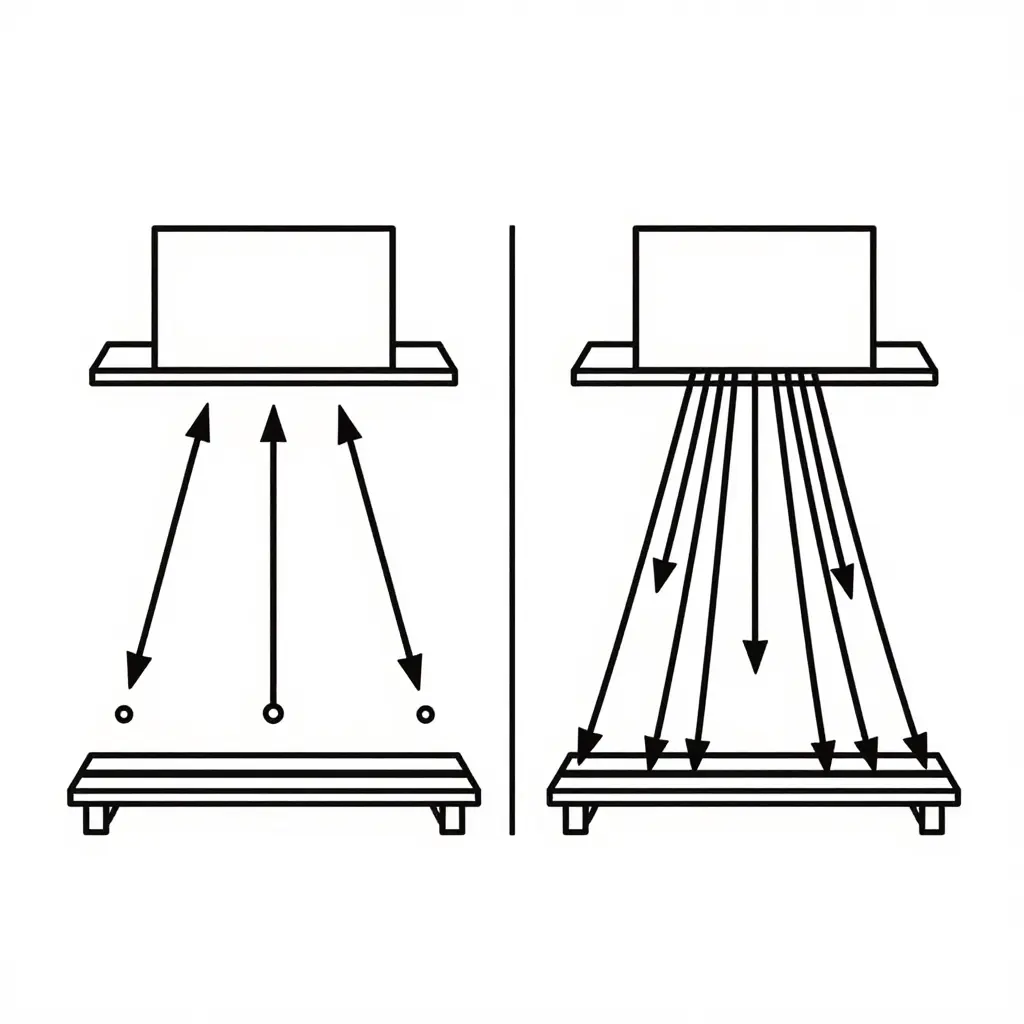
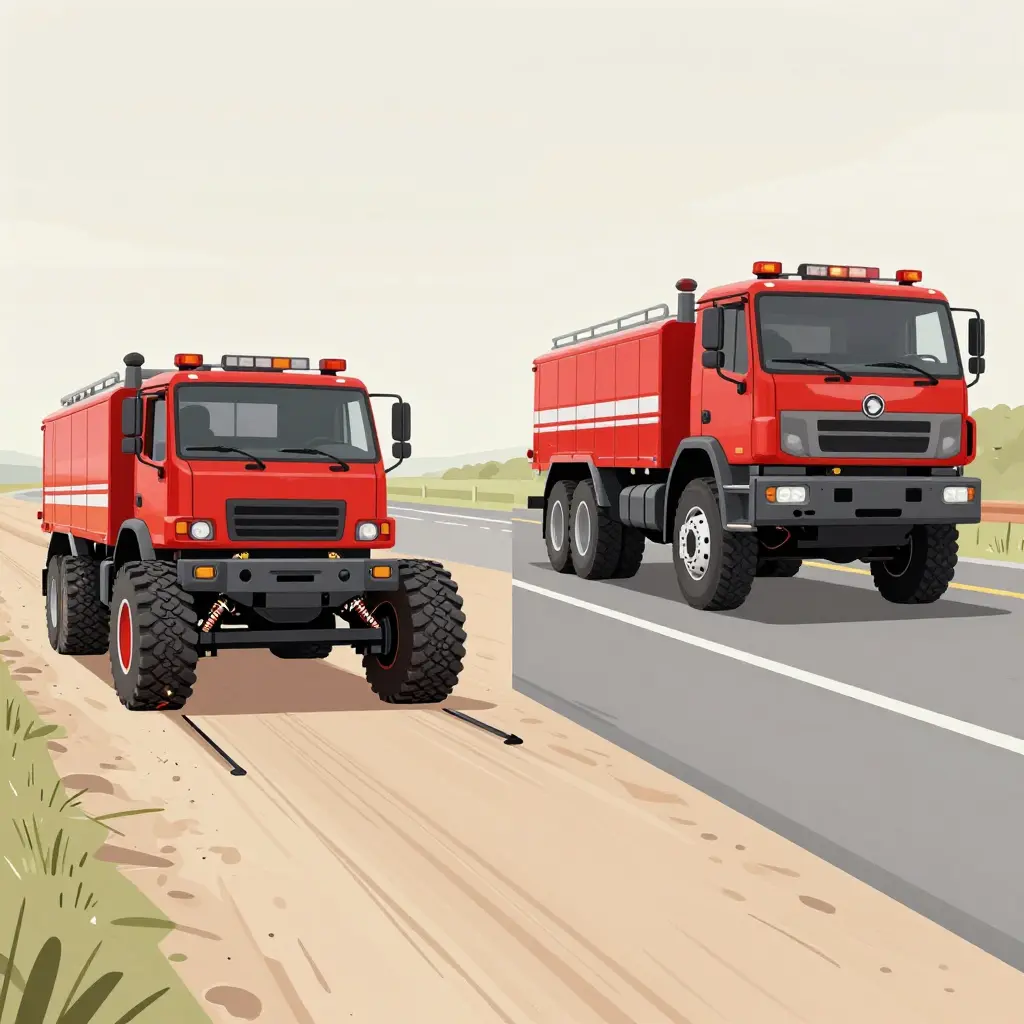
The left panel shows the arrangement most used rigs arrive with: a skid unit dropped straight onto the chassis frame and pinned at a handful of bolt locations. Every pound of water, foam, pump, hose, and crew-induced motion funnels through those few points, so each fastener and each short frame section absorbs a disproportionate share of the shock. On washboard forest roads and rutted two-tracks, that concentration is what cracks welds, elongates bolt holes, and fatigues the frame ears.
The right panel adds a subframe: an intermediate structure that picks up the skid, spreads its weight across many contact areas, then hands the load to the chassis rails along their length rather than at isolated spots. Same truck, same terrain, much lower stress at any single joint.
When you walk a used brush truck, look underneath and ask which picture you are buying.
Quick visual shorthand:
- Few arrows, thick and crowded = concentrated load, short service life on rough ground
- Many arrows, thin and spread = distributed load, forgiving structure
Why Rough Terrain Amplifies Mounting Weaknesses
A chassis is not a rigid beam. It is a ladder frame deliberately engineered to flex so the suspension can keep all four tires loaded over uneven ground. That flex is the point of the design, and it is also why mounting quality dominates durability on rough ground: the frame is supposed to twist, and the question is whether the equipment bolted to it is allowed to twist with it.
Torsional Flex Is the Load You Cannot See
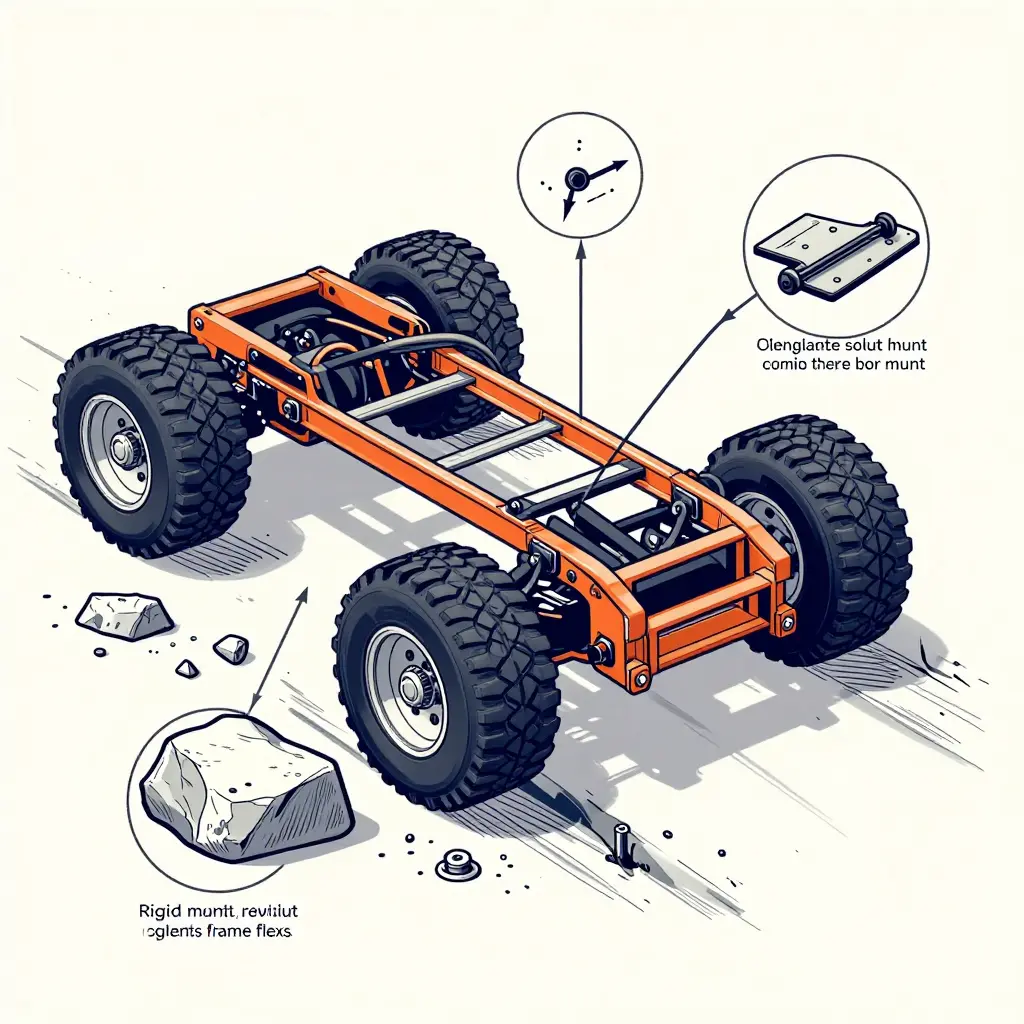
When one front wheel climbs a rock and the opposite rear wheel drops into a rut, the frame rails move out of plane relative to each other. The frame twists along its length, and any component spanning a meaningful stretch of that length gets dragged into the twist. A skid unit is exactly that kind of component: a stiff, welded box of tank, pump, plumbing, and tray, spanning several feet of frame.
A mounting system that is over-rigid, or rigid on three corners and shimmed on the fourth, has no compliance to offer. The frame wants to rotate; the skid unit refuses; the difference has to go somewhere. It goes into the mounting hardware as bending and shear at the bracket-to-frame interface, and into the rail itself as a localized stress concentration where the bracket stiffens an otherwise flexible section. That is where frame flex turns into hardware problems, which is why highway duty rarely produces them.
Shock and Vibration Cycle the Load Path
Washboard roads deliver a continuous stream of small, high-frequency inputs through the tires. Cattle guards present a sharp step input that hits one axle before the other. Off-road approaches, ditch crossings, and berm transitions load a single wheel corner and unload the diagonal, producing the largest torsional events of a shift. None of these are dramatic overloads. All of them cycle the mounting joint, thousands of times per season.
Four Failure Mechanisms to Inspect For
- Fastener loosening. Cyclic joint slip walks bolts past their preload, and a loose bolt loads its neighbors unevenly in a cascading pattern.
- Hole elongation. Bolts that move in their holes ream the bore into a slot, destroying clamp load and letting the bracket hammer against the frame.
- Weld toe cracking. The transition line where a gusset or bracket meets the frame concentrates strain, and repeated small cycles start a crack exactly at the toe.
- Bracket and frame rail fatigue. A sub-critical crack grows quietly through the heat-affected zone or the rail web until a routine trail approach finishes the job.
Fatigue Does Not Need a Single Big Hit
Fatigue is cumulative. A joint that never sees one dramatic overload can still fail, because damage accumulates with every cycle above the endurance limit of the detail. A highway-service rig with the same hours may run for years longer because its load path is never cycled hard: the brackets mostly carry static weight in compression and the frame barely twists. Put that same truck on graded fire roads and pasture approaches and the identical hardware begins working through a completely different duty cycle.
This is why hours and mileage mislead. A low-mileage brush truck that spent its life on washboard access roads can be closer to failure than a higher-mileage unit that ran pavement. Look for paint cracking radiating from weld toes, shiny wear rings around bolt heads, slot-shaped holes, and fretting dust under brackets. Those are the marks of a mounting system that has been fighting the frame and losing.
The Buyer’s Skid Unit Mounting Inspection Checklist
A used brush truck can hide a decade of rough service under fresh paint. The quickest way to expose it is to get on your back with a flashlight and read the mounting the way a mechanic reads an oil leak. Work the checks in order (brackets, then frame, then fasteners, then the skid-to-body interface) so you do not fixate on one bad bolt and miss the damage that matters.
- Start at the mounting brackets and read every weld, especially the weld toes. (Good: a smooth, continuous bead with a clean toe line and no undercut; failing: a hairline crack running along the toe, rust bleeding out of the bead, or a lumpy repair weld laid over old metal.)
- Lay a straightedge along the frame rail flange and sight the top and bottom flanges for straightness. (Good: flange flat within a few millimeters, with no dips or kinks; failing: waviness, dimples around bolt heads, or a downward bend at the rear, which are signs of overload or a hard impact.)
- Look up at each bolt hole and judge elongation. (Good: round holes with the bolt centered and the shank fully through the rail; failing: oval or teardrop holes, or a bolt resting hard against one side of the hole, which means the mount has been moving.)
- Check the washers and surrounding paint at every bolt head for witness marks. (Good: washers concentric with undisturbed paint and intact torque stripes; failing: shiny crescent rings, cracked paint, or a fresh washer sitting over an old rust ring, pointing to a loose fastener or a re-torque that never addressed the cause.)
- Inspect the bushings on isolated mounts by hand and with a pry bar. (Good: firm rubber with even compression, no splits, and a visible gap between inner and outer sleeves; failing: crushed or split bushings, missing isolators, or metal-to-metal contact where the rubber has already failed.)
- Crawl the full length of the subframe and confirm contact between subframe and frame rails, accounting for every shim. (Good: continuous contact, matching shim packs on both sides, and steel or stainless shims that are pinned in place; failing: daylight gaps, stacks of washers or rubber mudflaps used as shims, or an unmatched pack on one side that has twisted the skid.)
- Finish by probing the mounting interface for corrosion. (Good: light surface rust that wipes away and clean, tight seams; failing: flaking scale, pitting under the brackets, or white powder at aluminum-to-steel joints, the pack-rot that quietly thins structural metal.)
You will rarely find a perfect rig, so read the checklist as a pattern rather than a pass-or-fail grade. One isolated flaw may be a maintenance lapse a competent shop can correct for a known price. The same flaw at every mount, or mirrored along one side of the chassis, says the assembly has been working loose and flexing for years. Cheap fixes (washers, shims, a re-torque) are worth pricing in, while cracked weld toes plus elongated holes usually mean the subframe has to come off, and that changes the negotiation. Weigh the repair estimate against the asking price, then let mounting condition rather than the odometer cast the deciding vote.
Mounting Method vs. Durability: What Each Design Does Under Load
How a skid unit’s weight and impact energy travel into the chassis rails matters more than how many miles the truck has covered. Concentrated load paths create stress risers that rough terrain exploits; distributed paths share the beating. The table below summarizes how each common approach behaves.
| Mounting Method | How Load Reaches the Frame | Rough-Terrain Behavior | Typical Inspection Focus | Relative Repair Risk |
|---|---|---|---|---|
| Direct bolt-through to frame rails | Concentrated point loads at isolated bolt clusters | Loosens fasteners, ovalizes holes, cracks rail flanges | Bolt torque, elongated holes, flange cracking | High – rail damage is expensive to correct |
| Welded bracket mounting | Loads funneled through discrete welded brackets | Weld toes fatigue under repeated frame articulation | Weld toe cracks, heat-affected zone corrosion | High – frame weld repair needs certified work |
| Intermediate subframe or adapter cradle | Spread across multiple frame contact points | Flexes with chassis, spreads impact energy | Subframe fastener condition, frame contact points | Moderate – subframe replaceable, frame usually spared |
| Isolated mounts with elastomer bushings | Dampened, distributed through compliant bushing interfaces | Bushings absorb shock, but age and compress | Bushing compression set, cracking, bolt preload | Low to moderate – bushings are serviceable wear items |
| Hybrid subframe with isolation | Broad subframe footprint plus damped mounting interfaces | Best load sharing, noticeably slower fatigue accumulation | Composite fastener torque, bushing and subframe corrosion | Lowest – provided subframe design quality holds up |
Read this as a load-path principle, not a ranking. Distributed mounting generally outlasts concentrated mounting, but tank size, water weight, and GVWR can reverse the outcome on any specific truck.
Two caveats keep it honest. A fully loaded 300-gallon tank on a light chassis can overwhelm even a well-designed subframe, while a modest tank on an over-specified frame may tolerate a simpler mount. GVWR headroom and the tank’s center of gravity position change the dynamic loads far more than the mounting label alone. So read the mounting method alongside the data plate, the tank capacity, and a close look at the frame rails. Buyers comparing layouts across chassis classes may also want to review available truck body and subframe configurations to see how mounting architecture varies by build.
Mileage and Hours Are Context, Not a Verdict
The odometer answers one narrow question: how far did this truck travel? It says nothing about how hard the truck worked while standing still. On a working brush rig the engine can run for hours at a pump scene while the odometer barely ticks over. That is stationary pump time, and it shows up in the hour meter as engine duty, heat cycles, and cooling-pack wear rather than road miles.
Neither gauge measures load through the skid unit, which matters most for wildland firefighting apparatus. Torsion from a pump spinning against a loaded discharge, shock from dropping off a culvert lip, the slow twist of a frame flexing on a rutted two-track: that energy passes through the mounting interface, and nothing on the dash records a pound of it.
What these numbers genuinely measure
- Engine and driveline duty. Hours of combustion, oil shear, belt and hose aging, and the cumulative cost of heat.
- Transport versus pumping time. Road miles of transport set against idle-time pumping, which a low odometer can hide completely.
- Stationary duty on the pump, PTO, and cooling system. Heat cycles that wear parts without turning the wheels.
Where the numbers get distorted
Mileage and hours diverge from mounting fatigue in both directions. A low-mileage rig that spent its life on unpaved roads and long pump idles can carry far more mounting fatigue than a high-mileage truck that mostly logged highway transport. The dash looks flattering; the frame rails and isolators tell the truth. The inverse case is just as real, since a high-mileage unit that hauled to incidents and back with comparatively few loaded pump hours may have a surprisingly sound mounting interface.
| Reading | What it suggests | What it can hide |
|---|---|---|
| Low odometer, high hours | Truck worked while parked | Pump idle heat, mounting vibration, driveline shock |
| High odometer, low hours | Mostly transport duty | Loaded pump cycles may be minimal |
| Low odometer, low hours | Light use – or a replaced gauge | Long idle seasons, corrosion, dry-rotted isolators |
The evaluation hierarchy that actually holds up
- Read hours and mileage as context. Ask where the hours went, pumping or pavement, before either number frames the price.
- Inspect the mounting interface. Welds, bolt torque, isolator condition, frame rail contact, PTO alignment.
- Check frame condition. Cracks, pitting, previous field repairs, and straightness under load.
- Review pump service history. Seals, impeller wear, relief valve settings, and documented maintenance.
Use the two meters to start the conversation, then let mounting condition, frame integrity, and pump service drive the decision. That order separates a cosmetically tidy truck from one that will survive a season of rough terrain, and it is the same discipline worth applying when comparing municipal fleet vehicles against purpose-built units. A clean dash is an invitation to look closer underneath, not a conclusion.
What the Mounting Chart Shows
Sellers open with the odometer. This chart asks a different question: once a skid unit is bolted to a chassis, how well does that interface survive washboard gravel, rock shelves, and thousands of vibration cycles? The bars run from the crudest mounting arrangement on the left to the most engineered on the right, and the downward slope is the argument.
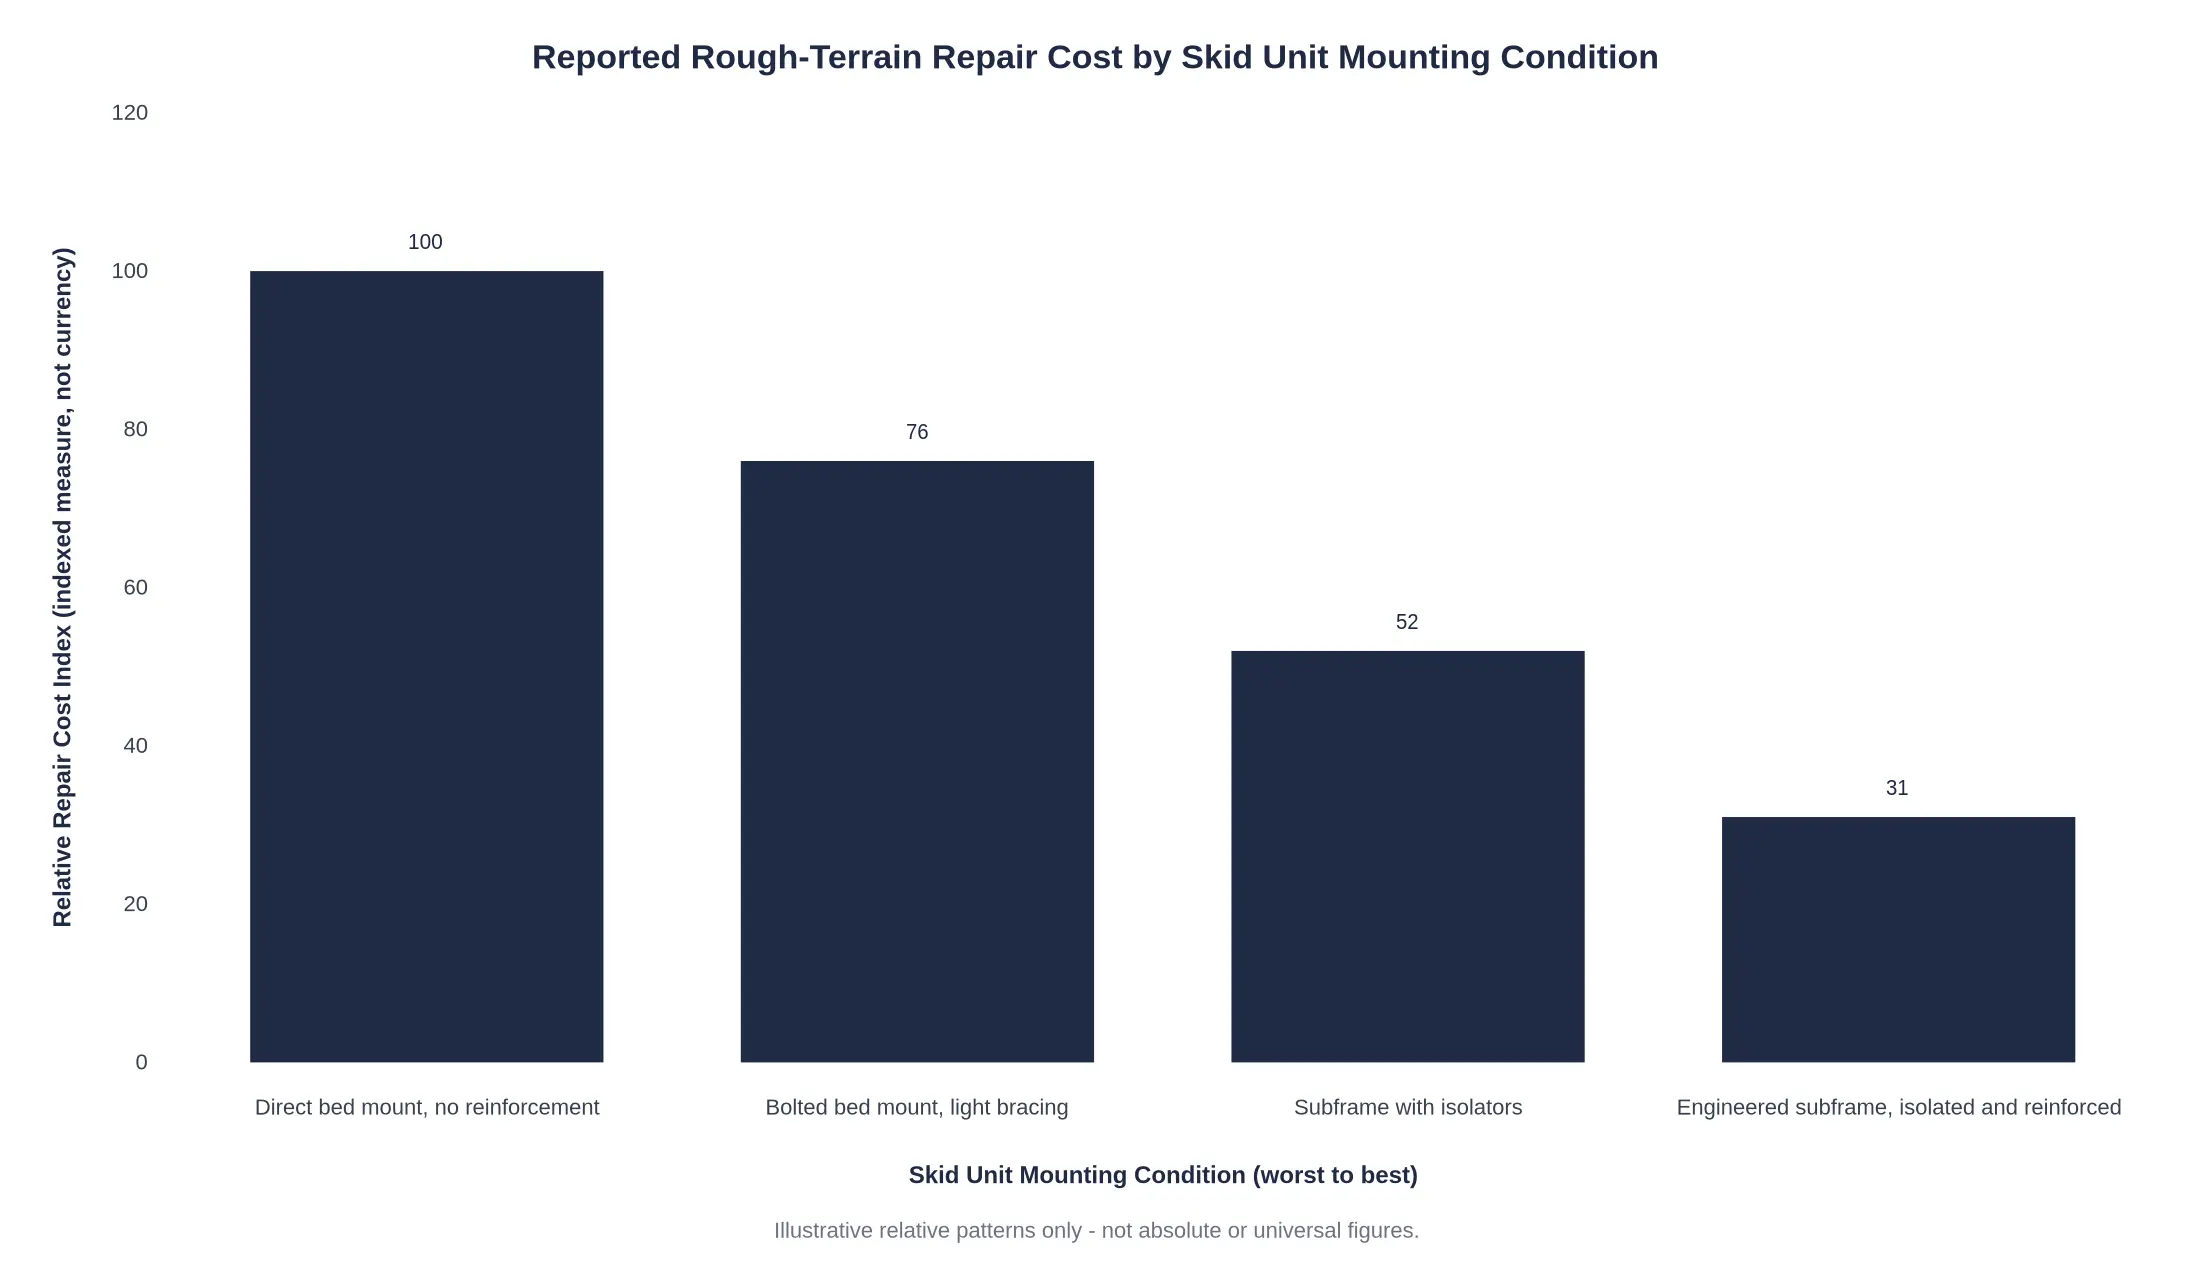
Figure: rough-terrain repair cost by skid unit mounting condition, expressed as a relative index rather than currency. The chart illustrates a pattern, not a universal benchmark.
A direct bed mount with no reinforcement sits at the top of the index, and each step toward an engineered subframe with proper isolation and reinforcement cuts the relative cost of rough-terrain repairs substantially. What a buyer should take from it is not a dollar figure. Mounting design, more than mileage, tends to predict which used rig keeps coming back to the shop and which one quietly holds together season after season.
Red Flags, Hidden Damage, and How to Verify What You’re Seeing
An odometer can be made to look honest, and fresh sheet metal can cover almost anything. Fasteners are harder to talk around. On a rig that has spent its life on fire roads and ranch tracks, the record of stress lives underneath the truck, in the brackets, shims, holes, and welds that carry the skid unit.
None of this is about hunting for reasons to walk away. It is detection discipline: see something, confirm it with a second, independent method, then price it. The flags below either end a purchase conversation or trigger a much deeper inspection.
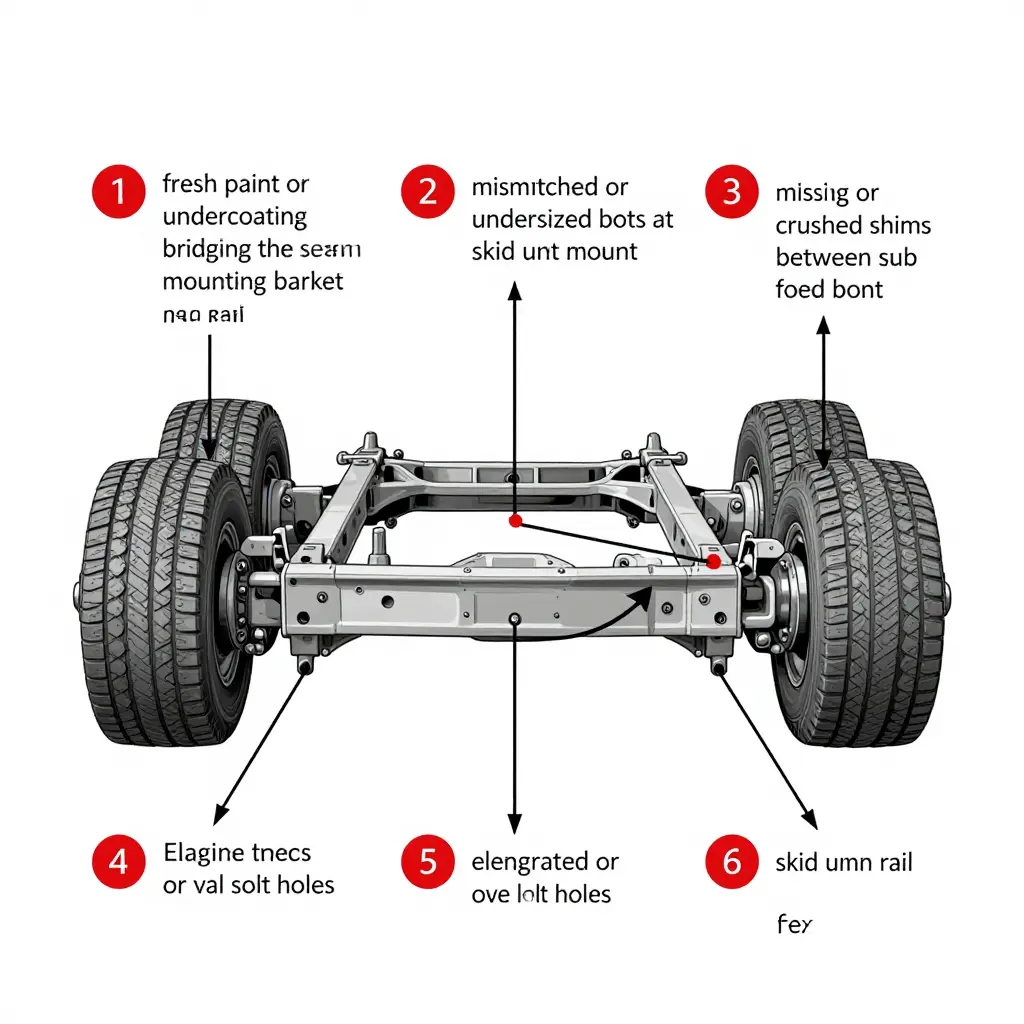
Six Flags Worth Stopping For
- Fresh paint or undercoating laid directly over mounting brackets and frame rails. New coating on a 12-year-old chassis is a masking agent, not maintenance. Verify with a torch and mirror: inspect the inside faces of the frame rail and the back side of each bracket, where paint cannot reach. Original factory coating plus rust bleed-through on one side and clean paint on the other is a strong tell.
- Mismatched or undersized fasteners. Mixing grade 5 and grade 8 hardware in the same joint, or finding bolts with heads smaller than the bracket hole, means someone replaced what failed with whatever was in the drawer. Verify with a thread pitch gauge and a caliper: measure shank diameter and count the marks on the head to confirm grade.
- Missing or crushed shims under a subframe. Shims distribute load and correct alignment. Crushed or absent shims mean the joint has been loose and hammering itself. Verify by feel and probe: run a thin feeler gauge under each subframe foot; a gap that varies side to side indicates movement, not tolerance.
- Cracks radiating from weld toes at brackets. Cracks start where the weld ends, at the toe line on the frame rail side of every bracket. Verify with a torch, mirror, and a wire brush: clean the toe to bare metal, inspect at an angle in raking light, then confirm with a dye penetrant kit. A crack you can feel with a fingernail is already a repair.
- Elongated bolt holes with no repair record. Oval holes mean the joint slipped under load. Verify by measuring hole diameter against the fastener’s nominal size on two axes. Anything beyond a millimeter or two of clearance, or any hole that has been slotted, needs a documented welded-and-redrilled repair or a new bracket.
- Skid units mounted rigidly across frame flex points. Frames are built to bend. A mounting rail bolted straight across a flex zone with no allowance for movement will crack the rail on rough terrain, usually right where the bracket meets the flange. Verify by confirming the skid unit matches the chassis rating – gross weight, mounting footprint, and the builder’s approved mounting points – then check for slotted holes, isolators, or spring mounts that show the installer knew the frame was meant to move.
Verify Twice, Decide Once
Every flag above has two jobs: to be found, and to be confirmed by a method that does not depend on the same sense that found it. A paint line spotted by eye gets confirmed with a mirror. A hole spotted by eye gets measured with a caliper. A suspicious bracket gets confirmed against a build record, so call the apparatus builder with the VIN and ask what mounting kit and hardware were specified. If the records do not exist, treat that absence as a finding rather than neutral ground.
| Flag | Second-method check | What a bad result looks like |
|---|---|---|
| Coating over brackets | Torch and mirror on concealed faces | Clean paint outside, corrosion or rust bleed inside |
| Mismatched fasteners | Caliper and thread pitch gauge | Undersized shank, mixed grades in one joint |
| Missing or crushed shims | Feeler gauge at each subframe foot | Uneven gaps, fretted metal contact |
| Cracks at weld toes | Wire brush, raking light, dye penetrant | Any indication line that catches a fingernail |
| Elongated holes | Hole diameter measured on two axes | Oval, slotted, or unwelded oversized hole |
| Rigid mounting across flex points | Chassis rating versus skid unit builder spec | No isolators, no allowance, no record |
Turn the Findings Into a Number
Do not negotiate on impressions. Photograph each flag, note the verification method used, and take the list to a welding shop or apparatus mechanic for a written repair estimate: bracket replacement, rail repair, reaming and sleeving, or a corrected mounting kit. That estimate becomes your negotiating position. Either the price absorbs the repair, or the seller completes it before delivery.
Cross-shopping chassis platforms from municipal and county fleets, you can also review municipal apparatus configurations to see how builders normally document mounting provisions. Detection discipline turns a gut feeling at the tailgate into a defensible number at the table, and that number is what protects your crew on rough terrain.
Matching Skid Unit Capacity to the Terrain and Mission Profile
A mounting built well still has to be loaded correctly, which means pairing mounting judgment with capacity judgment. Tank size is only the start: water weighs about 8.34 lb per gallon, so a 300-gallon tank adds roughly 2,500 lb the moment the pump is primed, before you count the skid frame, pump, foam cell, tools, and wet hose. That total has to live inside the chassis’s GVWR headroom and its front and rear gross axle weight ratings, not merely inside the footprint of the box. Where the pump sits matters too. A mid-ship pump keeps mass between the axles, while a rear-mounted pump and a fully loaded hose bed stack weight behind the rear axle, exactly where you can least afford it on a short-wheelbase rig.
Center of gravity and rear-axle weight distribution decide whether a rig feels planted or twitchy on side slopes, off-camber fire roads, and washboard. Push a skid unit near or above payload limits and the mounting hardware absorbs forces it was never sized for: crossmembers flex, fasteners loosen, welds fatigue, no matter how carefully the frame was fabricated. A smaller tank on a properly rated mounting system routinely outlasts a larger tank on an overloaded one. The crews that get the most seasons out of wildland firefighting apparatus sized the water to the terrain and the mission, not to the spec sheet’s bragging rights. Before you crawl under the frame of any brush truck for sale, work through the capacity questions below.
Capacity Questions to Ask Before Inspecting the Mounting
- What is the chassis’s rated payload, and how much of it remains after the skid unit, a full tank, and crew?
- What are the front and rear gross axle weight ratings, and how much of the loaded weight lands on the rear axle?
- What is the skid unit’s dry weight, and its wet weight with the tank full, pump primed, and hose bed loaded?
- Has the completed rig been weighed on a certified scale, and is there a weight ticket to prove it?
- What terrain will this truck actually work: grade, side slope, road width, and surface type?
Frequently Asked Questions About Skid Unit Mounting
Five questions buyers ask most often when evaluating a used brush truck.
What is skid unit mounting and why does it matter on a used brush truck?
Skid unit mounting is the frame, brackets, and fasteners that tie the pump, tank, and plumbing to the chassis. On a used brush truck it transfers every shock from rough terrain into the frame. Sound mounting keeps the unit aligned; weak mounting lets it flex, crack welds, and fail.
Can a poorly mounted skid unit be repaired or upgraded, and what does that involve?
Yes. Repair usually means replacing corroded fasteners, re-welding cracked brackets, adding gussets, and installing fresh isolators or body mounts. A shop may reinforce the subframe and re-torque the assembly to specification. Budget for labor and downtime. Severe frame distortion often makes replacement cheaper than repair.
Is a low-odometer used brush truck automatically a safer purchase?
No. Low mileage means little if the rig sat idle with water in the tank or spent years bouncing over rough terrain. Corrosion, fatigue cracks, and loose fasteners develop with time and vibration, not miles. Inspect the mounting before trusting an odometer reading.
How can a buyer assess mounting condition without a mechanic present?
Bring a flashlight and inspect every bracket, weld, and bolt head for rust streaks, cracks, elongation, and shiny wear marks. Push and pry the skid unit gently to feel for movement. Check torque marks and look for crushed or missing isolators. Photograph anything suspect before purchase.
Does mounting condition affect resale value and future service life?
Both, substantially. Solid mounting protects the chassis and pump from vibration, so the rig stays serviceable through years of rough-terrain response. Buyers and municipal fleet managers scrutinize it during appraisal. Documented repairs or upgraded brackets support a higher asking price and shorten resale negotiations.
The Decision Framework: Four Checks, in This Order
Most buyers read a spec sheet top down: year, mileage, hours, price. That is the wrong order for a brush truck. Work the four checks below instead, and the rig will tell you what it is worth before you discuss money.
1. Inspect the skid unit mounting first
Get under the frame and look at how the skid unit is actually attached. A proper wildland build uses a subframe with multiple attachment points spread along the frame rails, plates that distribute load instead of concentrating it on four bolts, and isolators or spring mounts where the tank and pump cradle meet the chassis. Look for stress cracks radiating from bolt holes, elongated holes, rust trails at the mounting feet, crushed or deformed frame flanges, and fresh paint or weld beads laid over an older frame, all of which point to repair after a hard life. Then check tank baffles through the fill opening and the pump mounting feet for the same story. A tank that has been walking on its mounts will show fretting and shiny wear marks.
2. Verify capacity second
Static capacity is easy to quote and hard to carry. Compare gross vehicle weight rating against the rig’s wet weight (full tank, full fuel, crew, hose, hand tools), then confirm the axle ratings, especially the rear, actually support that load. An overloaded chassis will not fail in the station. It fails on the third washboard road with the tank full. Baffle condition and pump plumbing belong in this step too, because a surging tank reloads its mounts every mile.
3. Read odometer and hours as context third
Mileage and hour meter readings are supporting evidence, never a verdict. Low odometer miles on a truck that idled or pumped for a decade tell a different story than the odometer alone suggests, and high miles on a well-mounted rig with documented maintenance can be far safer than low miles on a poorly mounted one. Use both numbers to explain the wear you found in steps one and two, not to overrule it.
4. Price the rig against mounting and frame remediation
Before negotiating, price what you saw: new mounting hardware and isolators, subframe repair, frame crack welding, re-cradling the tank, or a full remount. Deduct those estimates from the asking price, and treat unresolved frame damage as a hard stop rather than a bargaining chip.
The one sentence to carry into every inspection: a used brush truck’s ability to survive rough terrain is decided by how well its skid unit is mounted to the frame, not by what the odometer says.
One more lens: the wider chassis and body landscape
A brush truck is a chassis and a body bolted together, and the same judgment applies across the whole yard. Buyers comparing configurations often study dump truck chassis platforms to see how subframes and load distribution behave on a heavier rail, and browse municipal vehicle categories to watch body builders adapt the same chassis for very different service. Both are useful reference points for judging whether a fire body was engineered for its chassis or simply dropped onto it.
The buyer’s inspection discipline
It all comes down to one habit: inspect the mounting before you look at the price, verify capacity before you trust the badge, read the meters last, and let the arithmetic of remediation close the deal or end it. No listing photo, service record, or seller’s story replaces ten minutes under the frame with a flashlight. The buyers who end up with durable used rigs run the same sequence every time, and they walk away without regret when the mounting says walk away.