


Pre-Season Inspection of Used Agri Equipment: Hydraulic Leaks and PTO Wear
Buyers sourcing Craigslist Smyrna TN used agri equipment should verify hydraulic integrity and PTO driveline condition before the season starts. Those two systems are where most unplanned downtime on used tractors, loaders and implement carriers begins, and an inspection done before the first field pass costs a fraction of a breakdown in the middle of one.
What decides which finding matters is money and time: cost of ownership, seasonal timing, and the labor hours a small operation can actually commit. A defect that can be negotiated gets priced. One that cannot ends the deal.
Hydraulics come first, because leaks are both the most common fault on a used machine and the one buyers misread most often.
Hydraulic Leak Points That Fail First on Used Agri Equipment
On most used agri machines the first leaks do not appear at the pump or the main valve body. They show up at the cheap, highly stressed points: hose crimps, JIC and ORFS fittings, cylinder rod seals, and the base of control valve stacks.
Pressure cycling starts the wear. Every lift, tilt and steering correction sends a spike through the circuit, and fittings tightened years ago back off by fractions of a millimeter. The result is a weeping fitting: faint oil dampness around the nut, usually coated in dust. Wipe the joint dry, cycle the function three or four times under load, and look again. A fresh film means the connection is passing oil.
Heat expansion and contraction does the quiet damage. Oil at operating temperature expands, cools overnight, and pulls on crimps and seals. Machines that sit between jobs often leak at the crimp collar rather than the hose body, and the seepage shows up only after a cold start. Inspect before the engine warms up.
Seals harden with age, ozone and heat. Rod seals lose elasticity, the wiper stops scraping, and the cylinder starts to drift. A chrome rod carrying a thin oil ring and a stuck band of dirt is the classic sign, along with a loader or lift cylinder that sags several inches in ten minutes. Once you see either, test hold pressure under load; a static look at a parked machine proves nothing.
Contamination makes all of it worse. Dust enters through worn wipers and clogged breathers, mixes with the oil film, and builds wet dust around fittings and cylinders: a gritty paste that looks like mud and smells like hydraulic oil. Dark, cloudy fluid or a filter packed with sludge tells the same story.
Hose aging is the easiest to read. Sun and heat glaze the cover until it shines, cracks open near bends, and rub points wear the outer layer down to exposed wire. Squeeze the hose along its length, then look at how it is routed and clamped.
That gives an inspection order: a cold static pass for wet dust and crimp seepage, a loaded cycle test for drift and weeping fittings, then a recheck after shutdown while the machine is still hot. Treat what you find as negotiation evidence rather than cosmetic flaws, and price the repair before agreeing on a number. The same discipline applies when comparing purpose-built hydraulic lifting equipment for a commercial fleet.
Eight Hydraulic Leak Points to Check in Sequence
Work through these points in order, starting at the reservoir and moving outward, so you never chase a drip past its true source. On used equipment a wiped surface tells you more than a glance, so clean each joint first and recheck it after a short warm-up.
- Reservoir filler cap and breather. Check the cap gasket and breather element for oil mist, caked grit or a blocked vent. Pass: cap dry, vent breathing freely. Fail: an oily dust film, or a vacuum hiss when you open the cap.
- Suction hose and clamps. Trace the suction line from reservoir to pump and tighten any clamp that turns by hand. Pass: clamps snug, hose firm and uncracked. Fail: oil weeping at a clamp, or a hose that feels spongy and collapses under load.
- Pressure hose crimps. Wipe each crimped ferrule and look for a fresh oil ring where the hose enters the collar. Pass: dry ferrules, hose fully seated. Fail: oil film at the crimp, or hose pushed back out of the ferrule.
- Cylinder rod seals and gland nuts. Check every rod seal, and tighten a gland nut that has moved or shows thread exposure. Pass: chrome dry after cycling. Fail: a wet rod, a dripping gland, or a trapped dirt ring on the barrel.
- Valve block O-rings and spool seals. Wipe the block dry, then check each spool end for trails running down to the frame. Pass: block and spool caps stay dry in operation. Fail: oil paths at a section joint, or a seal that sweats while the lever is held.
- JIC/ORFS/BSP fittings and torque marks. Check whether painted or marked torque lines still align, and tighten only the fittings that have backed off. Pass: marks aligned, threads dry. Fail: shifted marks, or oil collecting at the hex.
- Quick couplers. Check coupler bodies and dust caps, and couple a hose to confirm a clean seat. Pass: dry, undamaged seals with no drip when coupled. Fail: oil on the poppet face, or a coupler that weeps under pressure.
- Filter head plus oil cooler lines. Check the filter head gasket and trace the cooler lines to the radiator core for chafing and rust bleed. Pass: dry head, sound lines, intact clamps. Fail: oil pooling under the head, or damp patches along a line.
Log every fail before you price the machine, and re-torque the same joints after the first hour of work. Owners running mixed fleets work through the same sequence on dump truck hydraulics before a season opens.
Use the grid below as a walk-around worksheet. Work top-down from the reservoir to the cooler, and grade each item before you negotiate. One High rating is not automatically a walk-away, but it belongs in your repair budget and not in the asking price.
Hydraulic Leak Point Reference for Used Agri Equipment
| Leak Point | Typical Symptom | Likely Root Cause | Pre-Season Check | Risk Rating (Low/Medium/High) |
|---|---|---|---|---|
| Reservoir breather | Oil misting and a dirt film around the filler cap; tank top always damp | Clogged breather element creating internal pressure that pushes oil past the shaft seal | Unclip the breather, inspect the mesh element, and confirm air passes freely in both directions | Medium |
| Suction hose and clamps | Pump whine that rises with load, foamy oil in the sight glass, weeping at the barb | Hardened rubber wall, loosened or corroded worm-gear clamps, air drawn in under vacuum | Check clamp torque with a nut driver, flex the hose for cracks, and watch for wall collapse while running | High |
| Pressure hose crimp | Damp collar on the fitting, fine jet of oil visible only when the circuit is loaded | Aged or under-crimped ferrule, corrosion under the wire braid, pressure spikes above hose rating | Shield the hose with cardboard and load the circuit briefly; reject any bulging or wet collar | High |
| Cylinder rod seal | Thin oil film on the chrome rod, drips at the wiper, rod creep with the valve centered | Nicks or pitting on the rod, contaminated oil, polyurethane lip hardened by heat | Wipe the rod dry, cycle the cylinder full stroke, and recheck for a fresh film after ten minutes | Medium |
| Gland nut | Seepage around the cylinder head threads; gland visibly backed out or cracked | Gland loosened by vibration, cracked thread, missing or extruded backup ring | Verify gland torque with a spanner against spec, then inspect threads for cracks and fretting | High |
| Valve block spool seal | External seep at the spool ends, sluggish or sticky spool return, oil collecting on the block | Worn O-rings, scored spool bore, metallic debris carried through the circuit | Clean the block, stroke every function to its stop, and watch each spool end for a fresh weep | Medium |
| JIC/ORFS fitting | Oil trace on the threads, damp hex, seep that returns after wiping | Over-torqued 37-degree flare, mismatched seat angle, missing or pinched ORFS O-ring | Back the nut off, inspect the seat for galling, fit a new O-ring, and retorque to the published spec | Medium |
| Quick coupler | Drip on disconnect, coupler that will not fully seat, oil on the dust cap | Worn or scored poppet, flattened O-ring, grit in the nipple, residual pressure locking the valve | Connect and disconnect with the circuit depressurized; replace the O-ring and flush the nipple before reassembly | Low |
| Oil cooler line | Misting across the cooler fins, oil pooling under the radiator, hot-spot smell | Chafed hose from poor routing, stone damage, failed hose-end crimp, vibration fatigue at the clamp | Trace the full routing by hand, look for rubbed spots and loose P-clips, and confirm the cooler core is dry | Medium |
Every High line is a bargaining fact. Price the seal kit, hose or gland before you sign, and photograph each wet joint with the hour meter in frame. If the machine shares components with a road-going chassis, the same order holds for hydraulic tipper systems on used dump trucks: reservoir first, suction side next, pressure side last.
PTO Wear: Where Used Agri Equipment Drivelines Lose Load Capacity
PTO wear rarely announces itself with a bang. On used agri equipment it accumulates one hard season at a time, until a mower bogs down in tall grass or an auger refuses to climb a full bin. Work the driveline in this order.
Spline Tooth Wear and Fretting
Pull the shaft and look at the male splines first, since that is where PTO wear usually begins. Crisp, uniform teeth under a light grease film are healthy. Polished, shiny tips with a step or shoulder where the slider stops traveling are not. Red-brown fretting dust packed into the valleys means the fit has been rocking under load, and that backlash only grows.
U-Joint Needle Bearing Play
Wipe each cross and cap dry, then work the joint by hand in both planes. Free rotation with a faint drag is normal. A gritty click, visible wobble, or rusty powder weeping past the seals means the needles have spalled. Ovalized yoke eyes are the end stage, when the joint no longer holds the shaft on center.
Shear Bolt and Slip Clutch Condition
A shear bolt should match the grade in the manual, which is usually a low-grade bolt with no head markings; a hardware-store grade 5 substitute hides a deeper overload instead of protecting the driveline from it. On slip clutches, smell and color tell the story: scorched discs, glazed friction plates and a burnt resin odor point to repeated slipping, while deep grooves in the pressure plates call for a rebuild. Check spring height against spec as well, because a backed-off clutch slips early and quietly derates the whole implement.
Shaft Phasing and Alignment
Yokes must be timed so the joint crosses sit in the same plane. Where the splines allow it, a shaft assembled one spline off vibrates hard at working speed, which is the quickest way to spot a phasing error. Then sight down the driveline and confirm the tractor and implement shafts run parallel within a few degrees, since steep angles accelerate U-joint and spline wear at the same time.
Mid-Shaft Bearing Play
Grab the mid-shaft carrier bearing and push it up, down and side to side. Any perceptible movement, perished rubber in the hanger, a torn boot, or a bearing that spins with no drag means it is due for replacement. A loose carrier lets the shaft whip, which hammers both yokes and the gearbox input seal.
Shift Collar Engagement Wear
On multi-speed gearboxes, look at the shift collar engagement teeth for rounded or tapered corners and bright wear bands across the faces. A collar that has been jumping out of gear under load will show heat discoloration and metal transfer on the fork slots. Work the engagement by hand and listen for a sharp, positive click, because a soft or partial engagement pops out the first time the implement hits a root.
| Component | Field indicator | Consequence if ignored |
|---|---|---|
| Spline teeth | Polished tips, fretting dust | Backlash and shock loading |
| U-joints | Red dust, ovalized yoke eyes | Vibration, yoke failure |
| Slip clutch | Scorched discs, glazed plates | Chronic slipping, heat damage |
| Phasing and alignment | Vibration at speed, yoke mismatch | Accelerated joint and spline wear |
| Carrier bearing | Lateral movement, perished rubber | Shaft whip, seal leaks |
| Shift collar | Rounded teeth, heat marks | Jumping out of gear |
Every item on that list costs money the same way. As clearance grows, the driveline stops transmitting torque cleanly and starts absorbing it, which shows up as a smaller implement, lower ground speed, more slip and more fuel. That is what derated load capacity looks like in the field, and it is why buyers comparing dump truck configurations check rated payload rather than brochure horsepower. Left alone, PTO wear shortens implement life through gearbox shock loads, seal leaks and repeat shear bolt failures, so price the repair before you commit.
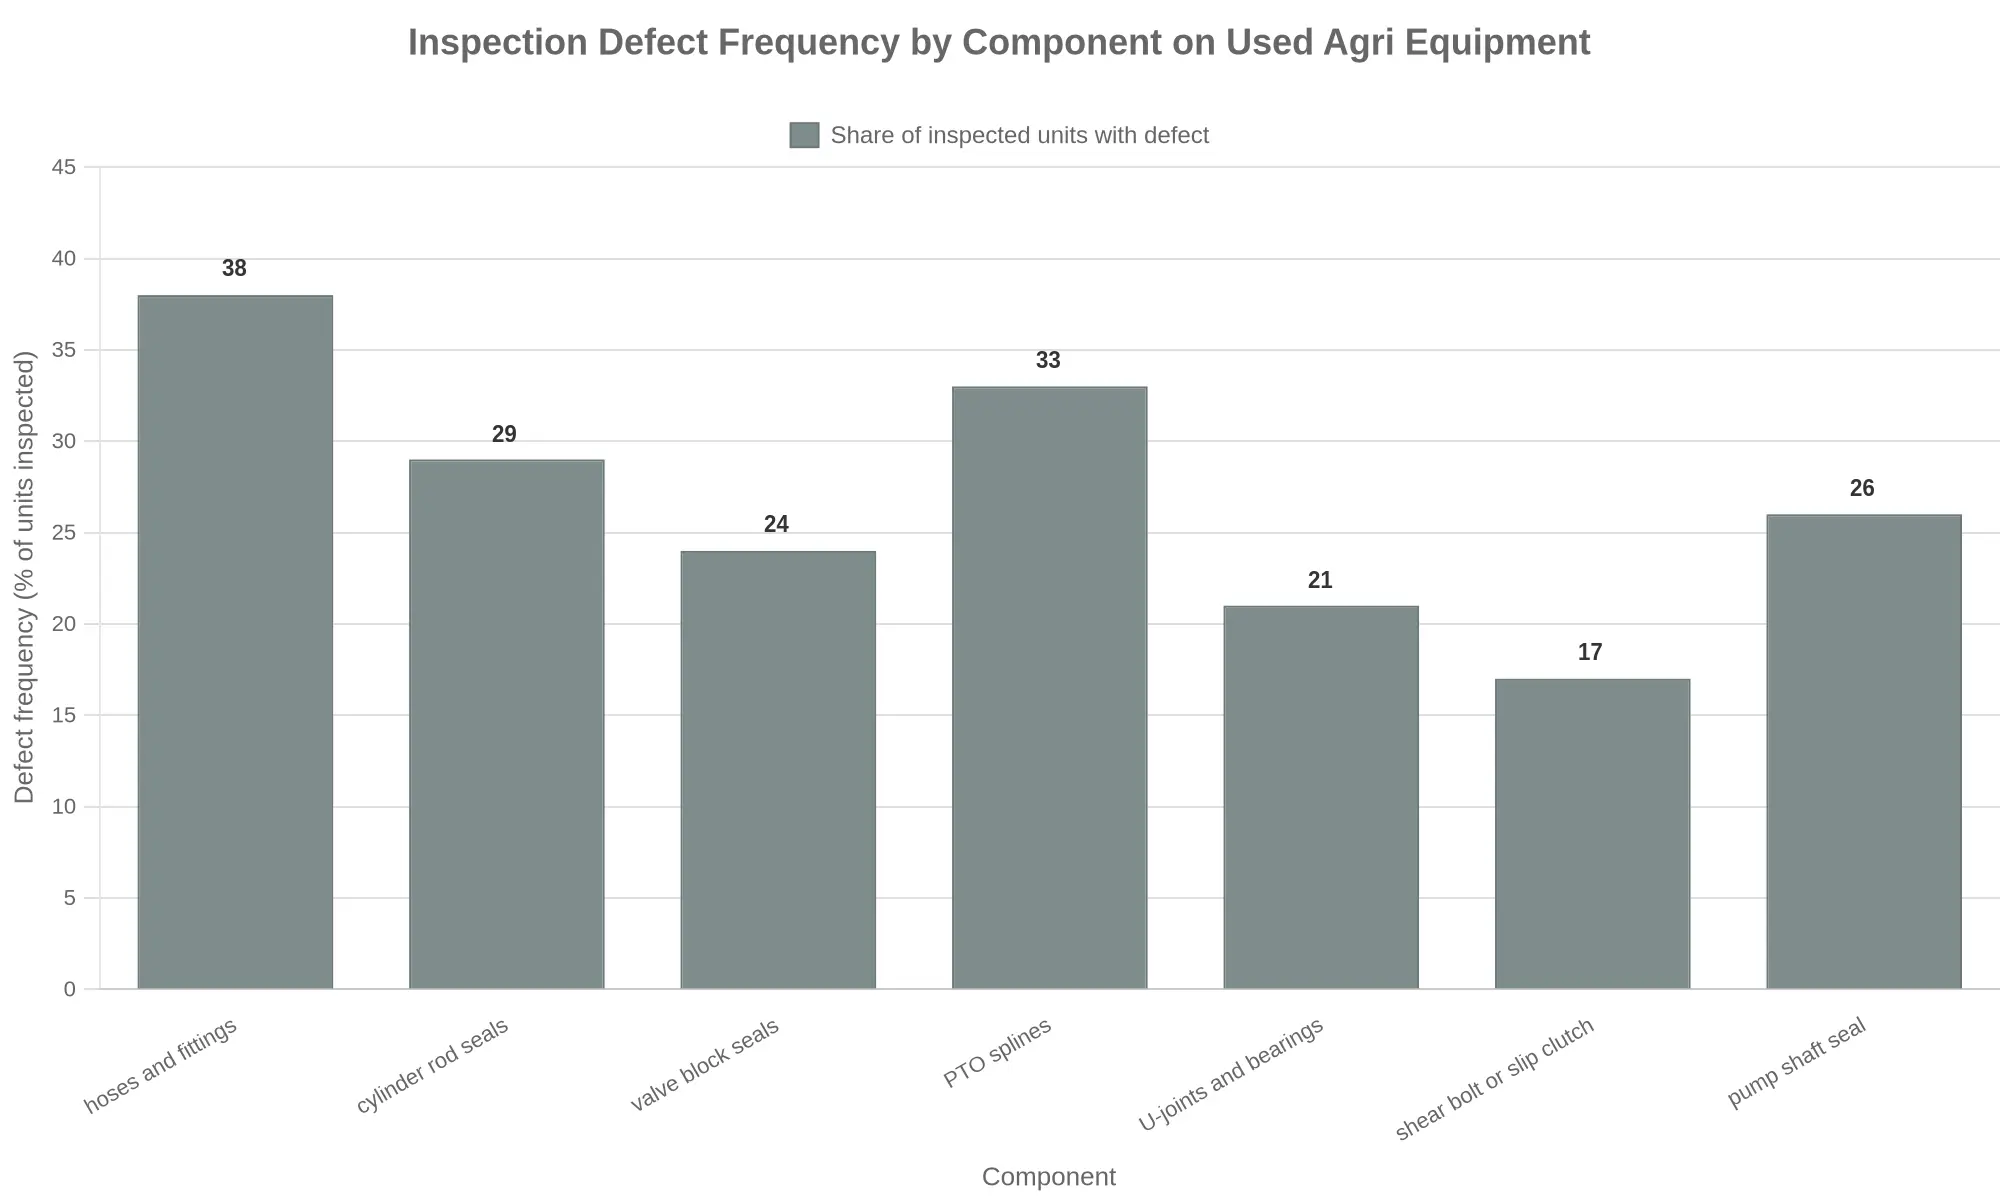
Inspection Defect Frequency by Component on Used Agri Equipment
When you walk a Craigslist Smyrna TN used agri equipment listing, the seller’s photos tell you about paint and tires. They tell you almost nothing about leak paths and driveline wear, which hide behind guards, under cabs, and inside a PTO housing that has been greased “whenever somebody remembered.”
To take some of the guesswork out of the pre-season walk-around, the chart below ranks the findings that turn up most often on used tractors, spreaders and loader-equipped units in the Middle Tennessee market. It is a planning profile built from inspection experience rather than a survey of a measured sample, so use it to decide where your first ninety minutes with a flashlight and a rag should go.
What the numbers are telling you
Two items sit clearly ahead of the pack, and neither is expensive to fix when you catch it early. Hoses and fittings at 38 percent is the usual used-equipment story: rubber ages out on a machine that sits eight months a year, and every aged hose is one pressure spike away from a puddle in the barn aisle. Replace the whole set rather than the single leaking hose, because the rest of the batch is the same age.
PTO splines at 33 percent matter because the damage stays invisible until it is expensive. A shaft that has run with a loose yoke wears its splines into a rounded profile, and a rounded spline under load is a shear-bolt-and-slip-clutch problem in waiting. The 17 percent on the shear bolt or slip clutch is where that shows up next: a driveline that keeps letting go is telling you about wear upstream.
Seal failures cluster in the middle of the range: cylinder rod seals at 29 percent, pump shaft seals at 26 percent, valve block seals at 24 percent. That ordering helps when you budget. Rod seals fail from grit drawn past a worn wiper, so a cheap wiper protects an expensive rod. Pump shaft seals fail from case pressure and misalignment, so check the coupling before blaming the seal.
U-joints and bearings land at 21 percent, near the bottom of the list; units in steady seasonal use wear them less than units that sit. A dry U-joint cap still fails by the roadside rather than in the field, so grease points belong on the delivery walk-around.
Turning the chart into a checklist
Rank your inspection time in the same order as the bars. Start at the hose runs, work outboard to the cylinders, then drop the PTO shaft and look at the spline profile with a light behind it. If you are pairing ag implements with road-going support equipment, confirm the hauler is rated for the load and settle the trailer plan before you commit to one.
One last buying note: ask the seller when the last hydraulic fluid sample was pulled. A frequency profile tells you where to look; a fluid sample tells you whether contamination is already circulating through the valve block you are about to trust.
PTO Wear Rejection Criteria for Used Agri Equipment
Walk the driveline before you hand over cash on a Smyrna TN listing. Any of the following findings justifies rejecting the unit or renegotiating the price downward, and the same discipline applies whether you are buying a hay baler or inspecting PTO-driven road-cleaning equipment for a municipal fleet.
- Visible spline tooth step wear on the PTO shaft or implement yoke: a stepped profile has already lost contact area and will strip under load, so reject the unit.
- Audible clunking or felt rotational play at any U-joint: spalled needle bearings cannot be greased back into service, and the joint will fail soon after purchase.
- A shear bolt that is missing or has been welded over. A solid weld removes the driveline’s designed overload protection and passes shock loads into the gearbox.
- Mismatched shaft halves, including a yoke, tube or spline from a different series. Mixed components run out of phase and wear fast at the joint.
- A PTO safety shield or retaining collar that is missing. Ask for a price reduction or walk away: an unshielded shaft is a citation risk and a serious entanglement hazard for operators.
- A slip clutch that will not slip under load. A seized clutch transmits full torque into the implement and defeats the driveline’s primary shock-absorbing device.
Document each finding with a photo and a dollar figure for the repair, then open the negotiation with that number.
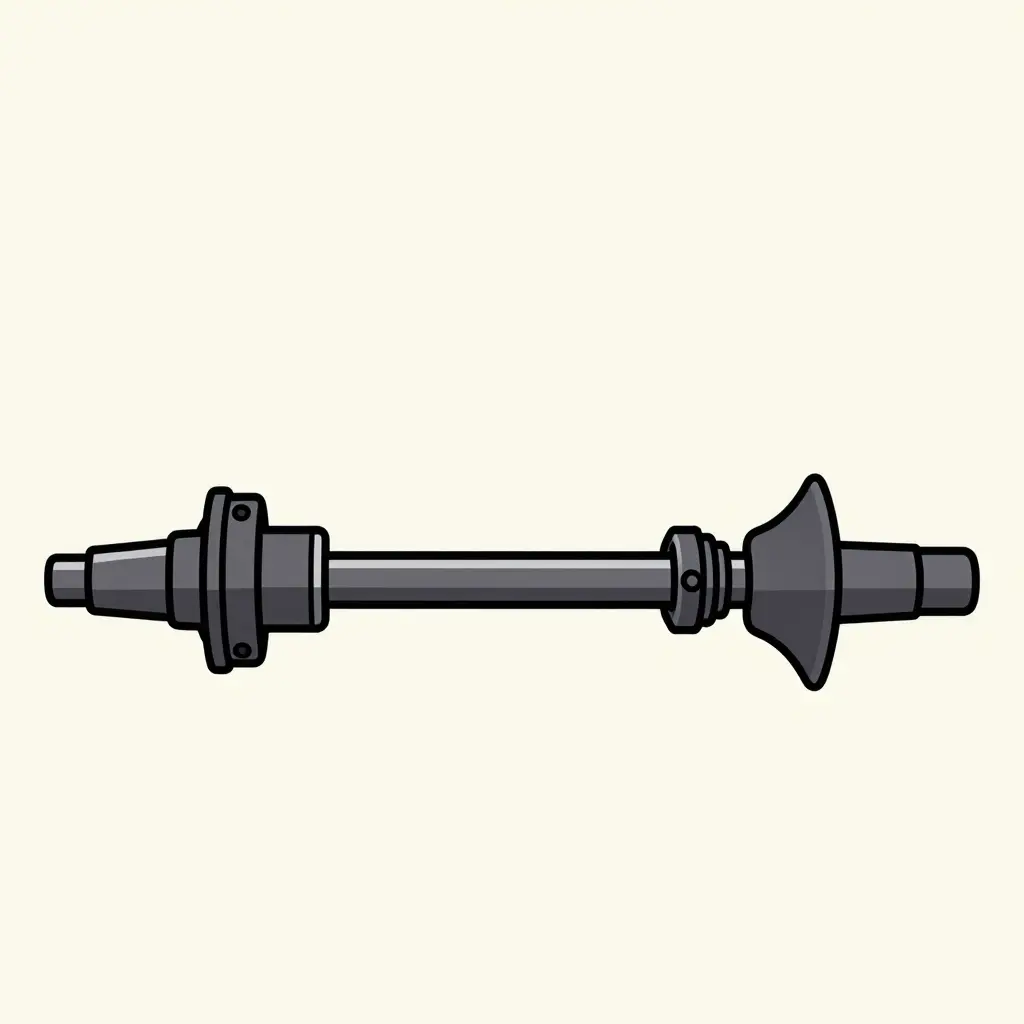
Use this simplified schematic to walk the driveline end to end before you buy. Each shape marks a component that deserves a hands-on check.
How to read the sequence during a pre-season inspection
Start at the tractor output shaft and work toward the implement input shaft. That order follows the torque path, so you inspect wear points in the direction the load travels. The spline coupling and U-joint usually show trouble first: polished teeth, a loose fit, or a rattle when you twist the shaft by hand. Move on to the mid-shaft bearing for play or a dry, gritty feel, then to the slip clutch or shear bolt for scoring, seized plates, or a bolt that has already stretched. The shield should spin freely and stay intact, and the implement input splines should look sharp rather than rounded off.
If the same PTO-driven hydraulic setup does double duty on your yard equipment, the load path is the one a factory-built tipper body and hoist is designed around, and the inspection habits carry over unchanged.
Field Verification Before You Commit to a Used Agri Equipment Purchase
Arrive early enough that the seller has not warmed the machine for you. A true cold start exposes slow cranking, blue or white smoke, a whining pump and lazy lift response that a pre-run engine hides. If the unit is already at operating temperature when you pull in, wait and ask for a cold start later in the visit.
Spend the first few minutes watching at idle. Listen for rattle near the PTO shaft, ticking from the engine top end, and any rhythmic groan from the hydraulic pump. Note what you hear now, because those sounds often disappear once the oil thins out.
Then run the machine to full working temperature under real load. Fifteen to twenty minutes of actual field or yard work brings hydraulics, transmission and engine up to heat. Problems that appear only when hot, such as slipping, fading lift and drifting implements, are the expensive ones.
Cycle every hydraulic function through its full stroke, in both directions, end to end: loader arms, bucket tilt, three-point lift, remotes and steering, each taken to the stops rather than nudged halfway. Watch for hesitation at the ends of travel, and for any function that moves slower than its neighbor.
After the workout, touch the return lines and fittings. A fitting or hose that runs noticeably hotter than the line beside it signals restricted flow or internal bypass, and it is usually the first place a pre-season leak will open up. Wipe the suspect area with a dry rag and recheck after another ten minutes of running.
For cylinder drift, raise the implement and hold it suspended with the engine off for a full minute. Visible sag, or a rod that creeps, points to piston seal wear or a leaking control valve. Repeat the hold test on each cylinder rather than judging the whole circuit from one.
Check PTO engagement at idle, then again with an implement attached and working. A clean engagement is firm and quiet; a knock, shudder or shaft wobble suggests worn splines or a tired over-running clutch.
Last, review fluid condition and filter dates, then reconcile the hour meter against physical wear. Dark, gritty or milky oil contradicts a low-hour claim, and pedal pads, seat bolsters, linkage play and tire wear should roughly match the displayed hours. On a Craigslist Smyrna TN used agri equipment unit, that cross-check between gauge and machine is the fastest way to catch an hours rollback.
Quick Reference: What Each Check Tells You
| Check | What It Reveals |
|---|---|
| Cold start | Compression, battery and starter health, pump condition |
| Full-stroke cycling | Cylinder seals, valve spool wear, flow balance |
| Fitting temperature touch test | Internal bypass, restricted lines, failing connections |
| Hold test | Piston seal integrity, valve leakage |
| PTO under load | Spline wear, clutch and shaft condition |
| Hours versus wear | Meter accuracy and true service life |
If the machine is being bought to support hauling or transfer work rather than field duty, review PTO-driven liquid waste truck configurations so your inspection criteria match the duty cycle you will actually run.
Document what you find with photos and notes. A seller who resists a cold start, a load test, or a hold test is telling you something useful, and walking away costs far less than a season of downtime.
Where Pre-Season Reconditioning Spend Lands on Used Agri Equipment
A realistic pre-season reconditioning budget on a used agri unit splits roughly like this. Hydraulic hoses and fittings take the largest single slice at 24%. Labor and testing follow at 20%, then cylinder and valve seals at 18% and PTO driveline components at 16%. Filtration and fluid run 12%, electrical and instrumentation 10%. Those are planning figures rather than a measured average. The two seal-and-hose categories together come to 42%, which is the argument for fixing a slow drip at a fitting before it takes out a pump.
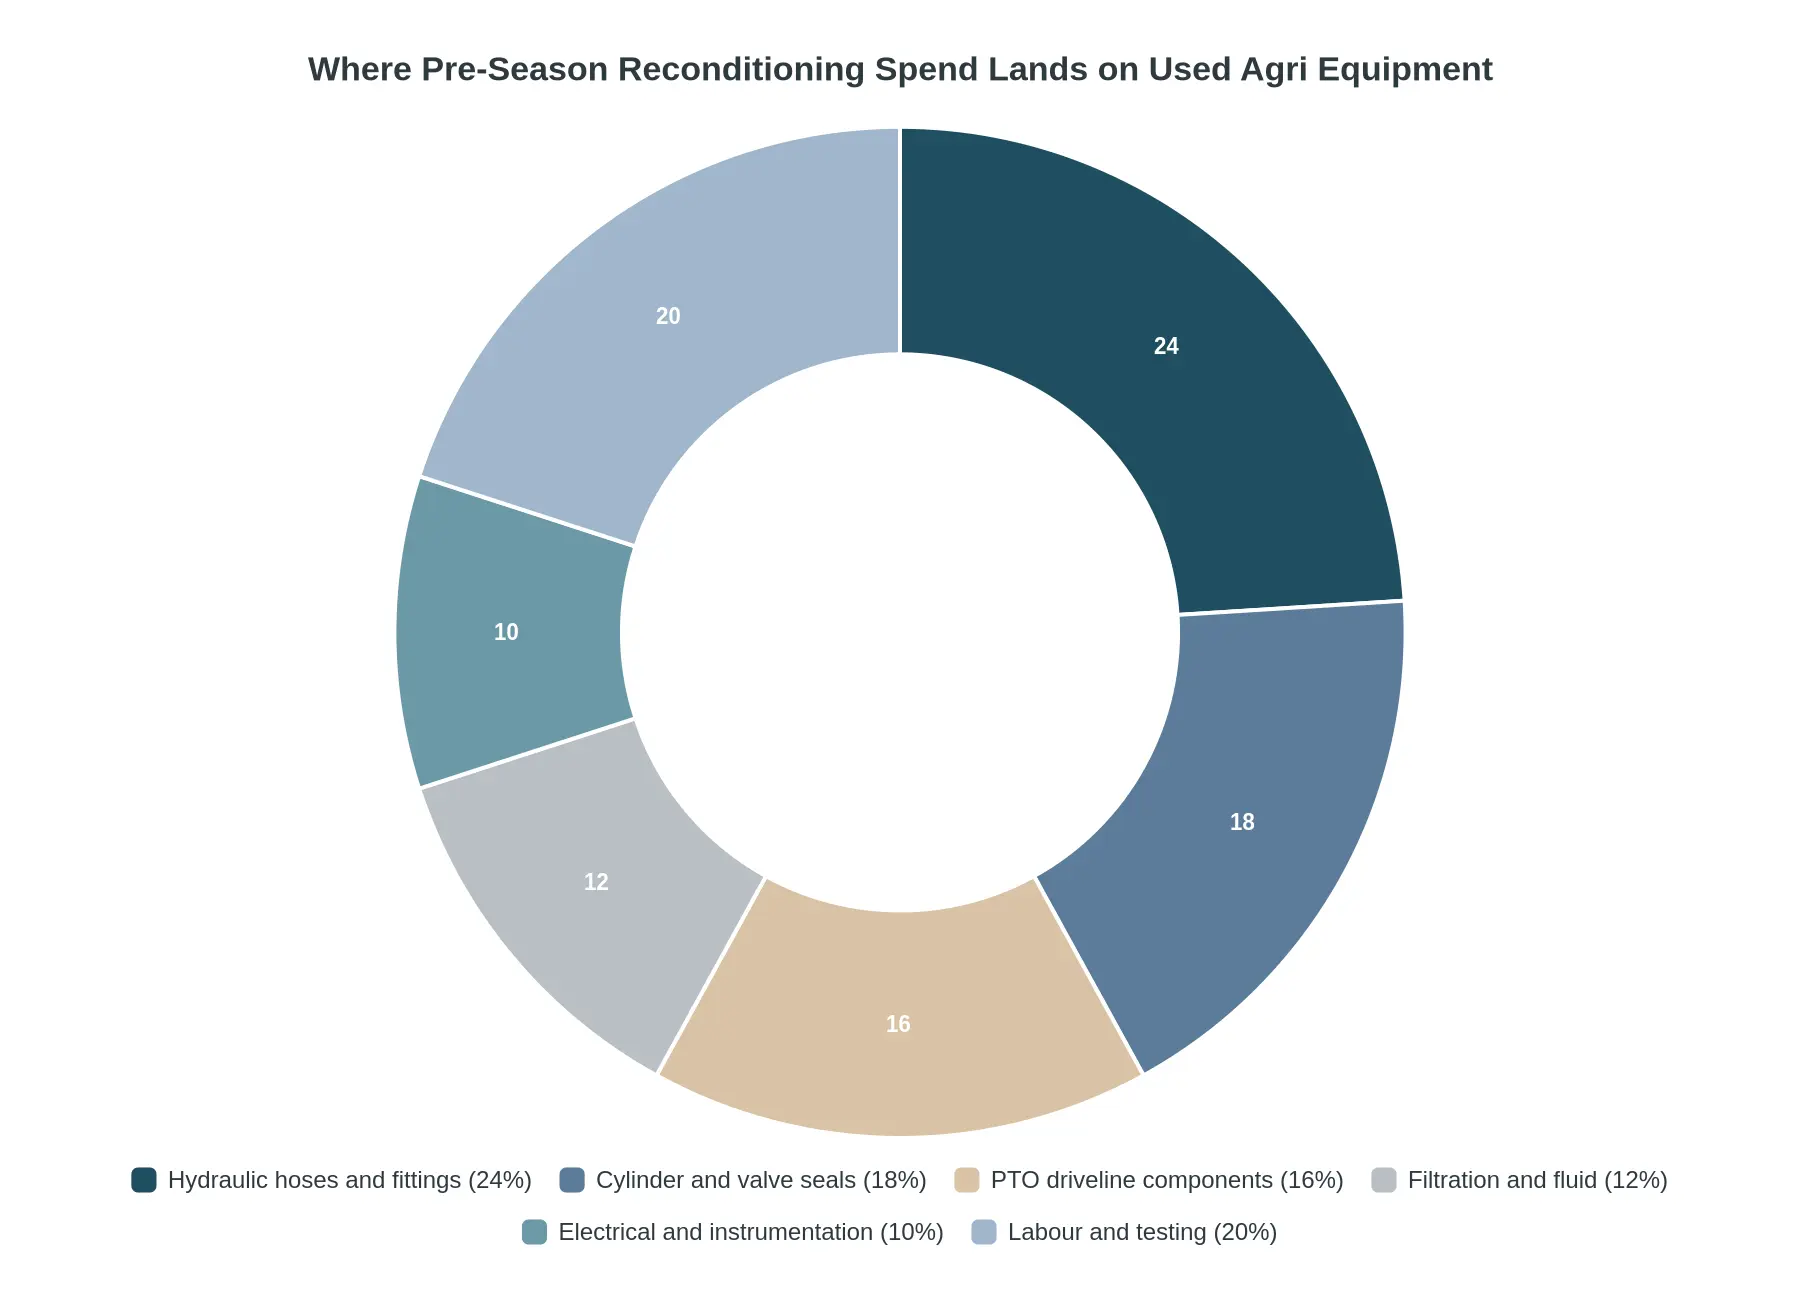
Chart Specification (render inline where referenced)
| Field | Value |
|---|---|
| Chart type | doughnut |
| Title | Where Pre-Season Reconditioning Spend Lands on Used Agri Equipment |
| Data unit | % share of a typical reconditioning budget |
| Legend | bottom, 6 entries |
| Labels | inline percentage labels on each segment |
| Palette | deep teal, muted steel blue, warm sand, soft grey with lighter tints |
| Style notes | flat 2D, no 3D, no decorative imagery, cutout 55% |
| Subsystem | Share of budget (%) |
|---|---|
| Hydraulic hoses and fittings | 24 |
| Cylinder and valve seals | 18 |
| PTO driveline components | 16 |
| Filtration and fluid | 12 |
| Electrical and instrumentation | 10 |
| Labor and testing | 20 |
| Total | 100 |
Use these proportions as a sanity check when you triage findings. A quote that puts PTO driveline work at half the total on a machine that is otherwise dry and tight deserves a second look at the rest of the unit.
Budgeting Reconditioning Cost Into the Purchase Price
An inspection report only has value once it is converted into money; until then it is a list of worries. Price every finding line by line, then use the total to move the seller.
Step 1: Price each leak point and wear item
For every hydraulic leak, break the estimate into parts and labor separately. A weeping hose or fitting is a cheap fix. A seeping cylinder rod seal usually means a full reseal, and the labor often costs more than the kit. Do the same for PTO wear: clutch pack, shaft splines, bearings and pump seals each carry their own parts cost and shop hours.
| Cost line | How to estimate it | Illustrative range (USD) |
|---|---|---|
| Hose or fitting leak | Part quote + 1.5 h labor | 90 – 260 per point |
| Cylinder reseal | Seal kit + 4-6 h labor | 320 – 750 per cylinder |
| PTO clutch pack | Kit + 6-10 h labor | 600 – 1,400 |
| PTO shaft splines or bearings | Shaft/bearing set + 2-4 h | 180 – 520 |
| Pressure and flow test | 1-2 h diagnostic | 100 – 250 |
| Fluid, filters, disposal | Liters x oil price + filter set | 150 – 400 |
Step 2: Do not forget testing and fluids
A repair you cannot verify is a guess. Budget a pressure and flow test after the work, plus a full hydraulic oil and filter change and disposal fees. Small individually, material in total.
Step 3: Compare total landed cost
Add purchase price, reconditioning, transport and expected downtime, then benchmark that figure against the alternatives: a unit with documented service history, or new equipment financed over the same term. If a replacement machine also changes your haulage capacity planning, that operational gain belongs in the comparison, along with any transport support needed to move the unit home.
Load handling deserves its own line. If the machine feeds a loader crane or similar attachment, a weak hydraulic circuit shows up as slow cycle times under load, so price a flow test against the attachment’s demand. If the load handling and equipment configuration of a cargo box body will be adapted later, add fabrication and mounting costs now rather than discovering them mid-season.
Step 4: Turn the worksheet into a negotiating position
Present the estimate as a single sheet: findings, parts, labor, tests, total. Ask for a price reduction equal to that total, or for the seller to complete the priority repairs before pickup. Sellers rarely argue with line items they can verify.
As a rule of thumb, a used unit stops being viable once reconditioning plus transport exceeds roughly a third of the price of a comparable machine with documented service history.
Frequently Asked Questions
How can I tell an active hydraulic leak from residual oil residue?
Clean each of the main hydraulic leak points with degreaser, dry it fully, then run the machine under working load for ten to fifteen minutes. Fresh oil gathers at fittings with wet edges and new drips; older residue stays dry and darkened.
How much PTO spline wear is acceptable?
Light polishing and a uniform shine are normal. Wear becomes a concern when splines show visible steps, sharp edges, or a loose fit that rocks under load. Any measurable backlash beyond manufacturer specification means the shaft or coupling should be replaced.
Can a weeping hydraulic fitting be repaired, or does the hose need replacing?
Often the fitting itself is the source. Replacing the O-ring, seal or compression ferrule and re-torquing to specification frequently stops the weep. Replace the hose when the wire braid is exposed, the outer cover is cracked, or the crimp collar is deformed.
What documentation should I request from a Craigslist Smyrna TN seller of used agri equipment?
Ask for the service log, maintenance invoices, engine and hour meter photos, prior inspection reports, and any warranty or repair records. Request the serial number and confirm it matches the machine. A bill of sale with the seller’s identification protects the purchase.
How often should a pre-season inspection be repeated on a used unit?
Repeat a full inspection before every season and after any period of long storage. Units kept outdoors benefit from a mid-season check of hoses, fittings and driveline components. Increase frequency after heavy use, or once the machine has passed its recommended service interval.
Turning Inspection Findings Into a Buying Decision
A pre-season inspection is only useful if it changes what you pay or whether you buy at all. On used agri equipment, hydraulic leaks and PTO wear carry the highest downstream cost of any finding, because both sit at the center of the machine’s working system. A seeping cylinder seal on a tractor loader or a worn PTO shaft on a baler rarely stays a small repair once the season starts.
The decision rule:
- Hydraulic leaks mean pressure loss, contamination risk and repeat seal failures. Repair cost is often modest; downtime inside the working window is not.
- PTO wear signals hours under load that the hour meter may not show. Spline and yoke wear escalates into shaft, gearbox or implement damage.
- Everything else, including tires, cab fittings, lights and minor electrical faults, is negotiable and can usually be priced.
Findings in these two systems are leverage in the negotiation, not a discount line. Either the seller adjusts the price to cover a full repair with margin, or the machine is rejected. A small reduction for a hydraulic or PTO problem transfers the risk to you, and that risk is measured in lost working days.
An Alternative Path for Buyers Who Need Predictable Uptime
Buyers whose margins depend on scheduled work rather than opportunistic listings often need a sourcing route where the maintenance history is documented and the specification is known in advance. Factory chassis are specified around continuous duty cycles rather than seasonal peaks, which is the part a used listing cannot show you. The municipal vehicle range is one place to start.
Where the work involves collection and transfer, liquid waste collection vehicles and solid waste handling units are specified around tank integrity and compaction loads, the same wear areas that make a used unit expensive. Yards, lanes and hardstanding get road cleaning equipment configured for repeatable daily routes.
The practical comparison is a lower purchase price with unknown hydraulic and driveline history against a higher price with a known service record. For an operation that cannot absorb a mid-season failure, the second is usually the cheaper number.
Document what the inspection found, attach the repair quotes to the offer, and schedule the next inspection ahead of the following pre-season window, while the record is still current.