

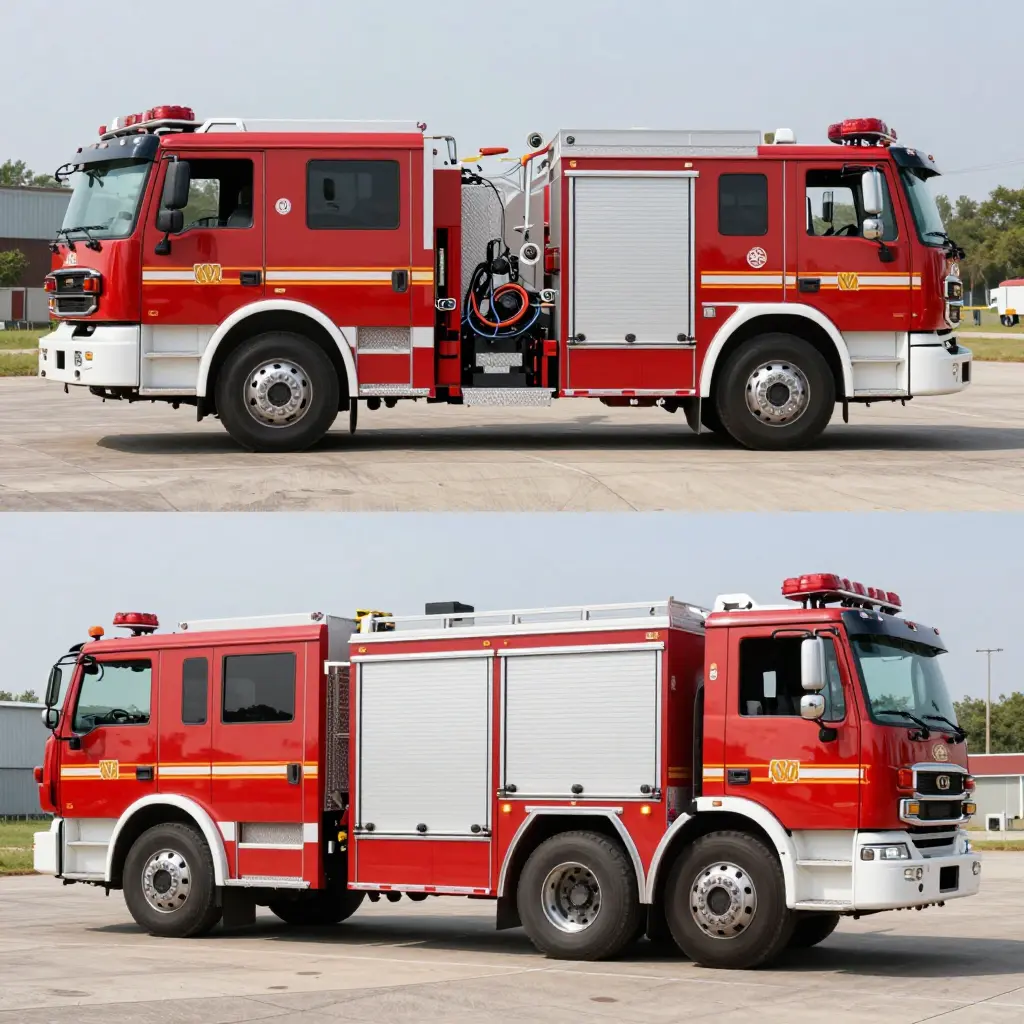
What Actually Sets a Fire Truck Price
Fire truck pricing comes down to configuration and hours: which chassis you buy, and how long the body shop takes to hang a body on it. Buyers tend to assume the engine badge sets the number. The engine is one line on a quotation, and a small one beside the structural work around it.
Every quotation, however it is laid out, resolves into five cost blocks: chassis, body and equipment materials, body mounting labor, integration engineering, and testing and handover. Three of them carry the bulk of the money, and separating them is the fastest way to test two bids that claim to describe the same vehicle.
The Three Cost Blocks You Are Paying For
Chassis. The rolling foundation: frame rails, axles, suspension, brakes, cab and drivetrain. A cab-over chassis sets the cab above the front axle, which shortens overall length for tight streets and narrow station bays. A conventional chassis puts the engine ahead of the cab, adds length, and frees cab volume for crew and equipment.
Body materials. Everything that carries water, equipment and people: subframe, compartment shells, tank, pump housing, and the steel, aluminum or composite specified for them. Material grade, compartment count and finish move this block far more than the drivetrain does. Two trucks on identical chassis can differ by a wide margin here.
Body mounting labor. The engineering and bench work that joins body to chassis: subframe fabrication, welding, crossmember alignment, harness routing, plumbing, pump integration, pre-delivery testing. It is quoted in hours, and the hours scale with how well the chassis and body were designed for each other.
The two smaller blocks follow the same rule. Integration engineering and testing cost little on a truck that goes together as drawn, and a great deal on one that needs its wiring re-routed and its pump re-aligned. The chart further down shows how all five sit against each other.
Body mounting labor is the block that varies most between builders. A conventional chassis with a clean, well-documented mounting interface can take fewer hours to dress than a cab-over that needs custom brackets and re-routed lines. That difference lands in the total long before anyone discusses horsepower.
The same split applies to other municipal vehicle categories, where the blocks carry different names and the same arithmetic.
Cab-Over Versus Conventional Chassis: Where the Price Gap Comes From
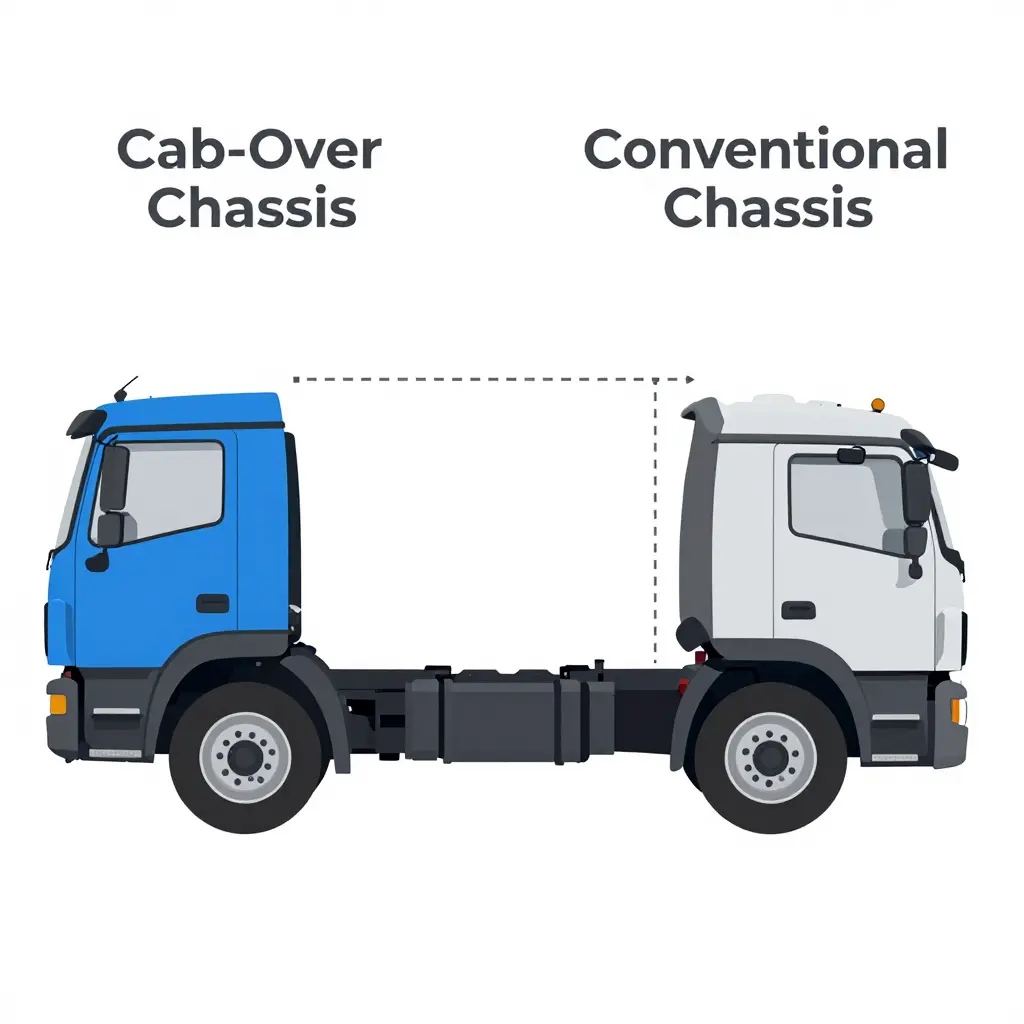
Two trucks can carry the same pump, the same tank and the same badge on the grille and still land tens of thousands of dollars apart. The engine rarely accounts for it. Wheelbase, frame length behind the cab, and how much adaptation the body needs do.
Two Layouts, in Plain Terms
- Cab-over chassis: the cab sits directly above the front axle. No nose, so the wheelbase shrinks and the turning circle tightens, while the frame behind the cab runs long.
- Conventional chassis: the engine sits ahead of the cab under a hood. You get a longer nose, easier engine access, and more weight legally carried on the front axle, at the cost of frame length behind the cab.
Both layouts work. They spend the budget in different places.
How Layout Moves the Fire Truck Price
Available body length behind the cab. Start here, because it drives the rest. A cab-over hands the body builder nearly the full frame length; a conventional chassis hands over a shorter runway because the nose consumed part of it. On a fixed overall length, that decides whether you get a full-depth compartment or a compromise.
Apparatus compartment volume. More frame behind the cab means more cubic feet for hose beds, rescue compartments and equipment trays. A conventional chassis on the same wheelbase typically yields less. Buyers find out when the compartments stop fitting the equipment list.
Pump and PTO placement. Mid-ship pumps sit cleanly behind a cab-over cab. On a conventional chassis the engine, transmission and steering gear crowd the same space, so the pump, PTO and plumbing often need relocation, custom bracketry or a longer driveline. Each of those is billable fabrication time.
Front-axle weight allowance. A conventional chassis puts the engine over or ahead of the front axle, which usually allows a higher front-axle rating, a real advantage for heavy front-mounted pumps, winches and plows. A cab-over carries cab and crew over the front axle instead, so tank and pump placement is planned around a lower limit.
Chassis modification before body mounting. Cutting rails, relocating crossmembers, rerouting exhaust and wiring, adding spacers, reworking the cab-to-body gap. None of it shows up on an engine spec sheet. All of it shows up on the invoice.
| Decision point | Cab-over chassis | Conventional chassis |
|---|---|---|
| Frame length behind cab | Long | Shorter |
| Compartment volume potential | Higher | Lower |
| Pump and PTO fit | Usually straightforward | Often needs relocation |
| Front-axle load capacity | Lower; cab and crew sit over the axle | Higher; engine sits ahead of the cab |
| Pre-mount modification | Cab tilt clearance and frame interface | Exhaust, fuel and driveline rerouting |
Why This Points to Labor, Not Horsepower
The comparison is easy to run. Take two builders to the same engine and the same pump, and the numbers tighten. Ask those two to quote a cab-over against a conventional for the same department and they split on hours: welding, plumbing, wiring, and the engineering time spent solving interference that did not exist on the other layout.
Engine choice is a purchase. Layout is a hundred small decisions about where steel, pipe and wire have to go, and each one is settled at an hourly rate. A 50-horsepower upgrade is a line item. A wheelbase that forces a custom subframe is fabrication work the quote has to carry.
So compare layouts before engines. Ask each bidder how many hours of chassis modification sit between delivery and body mounting, and what the body length behind the cab costs in compartment space. Departments balancing crew safety, turning radius and storage against budget will see those tradeoffs laid out faster in a municipal vehicle lineup than in a spec table.
Cab-Over and Conventional Chassis Compared
| Factor | Cab-Over Chassis | Conventional Chassis | Effect on the Quote |
|---|---|---|---|
| Overall length for the same body size | Shorter | Longer | Drives spec length and body fit |
| Turning radius | Tighter | Wider | Access and site constraints |
| Available body and compartment length behind the cab | Longer | Shorter | Compartment count and layout |
| Front-axle load allowance | Lower; crew weight sits over the axle | Higher; engine weight sits ahead of the cab | Axle rating and tire spec |
| Crew cab space | More upright, compact footprint | More floor space, longer wheelbase | Cab choice trims body length |
| Chassis modification work before body mounting | Cab tilt clearance, frame adapters, subframe shaped around the cab | Exhaust, PTO and driveline work around the engine bay | Shop hours before the build |
| Typical body mounting labor hours | Higher | Lower | Largest swing in the quote |
| Relative contribution to fire truck price | Larger labor share; chassis often cheaper | Smaller labor share; chassis usually more expensive | Moves the total more |
Either way the layout moves hours in the body shop, so it belongs next to the chassis line on the quote, not under engine spec.
Why Body Mounting Labor, Not Engine Spec, Moves the Quote
Two quotes can list the same engine, the same transmission and the same pump rating and still land far apart on the invoice. Horsepower is the easy line to read off a spec sheet, so buyers assume it drives the price. It does not. Engine spec is a catalog purchase with a published price; fabrication hours measure how hard the truck fights the shop, and that fight happens in body mounting.
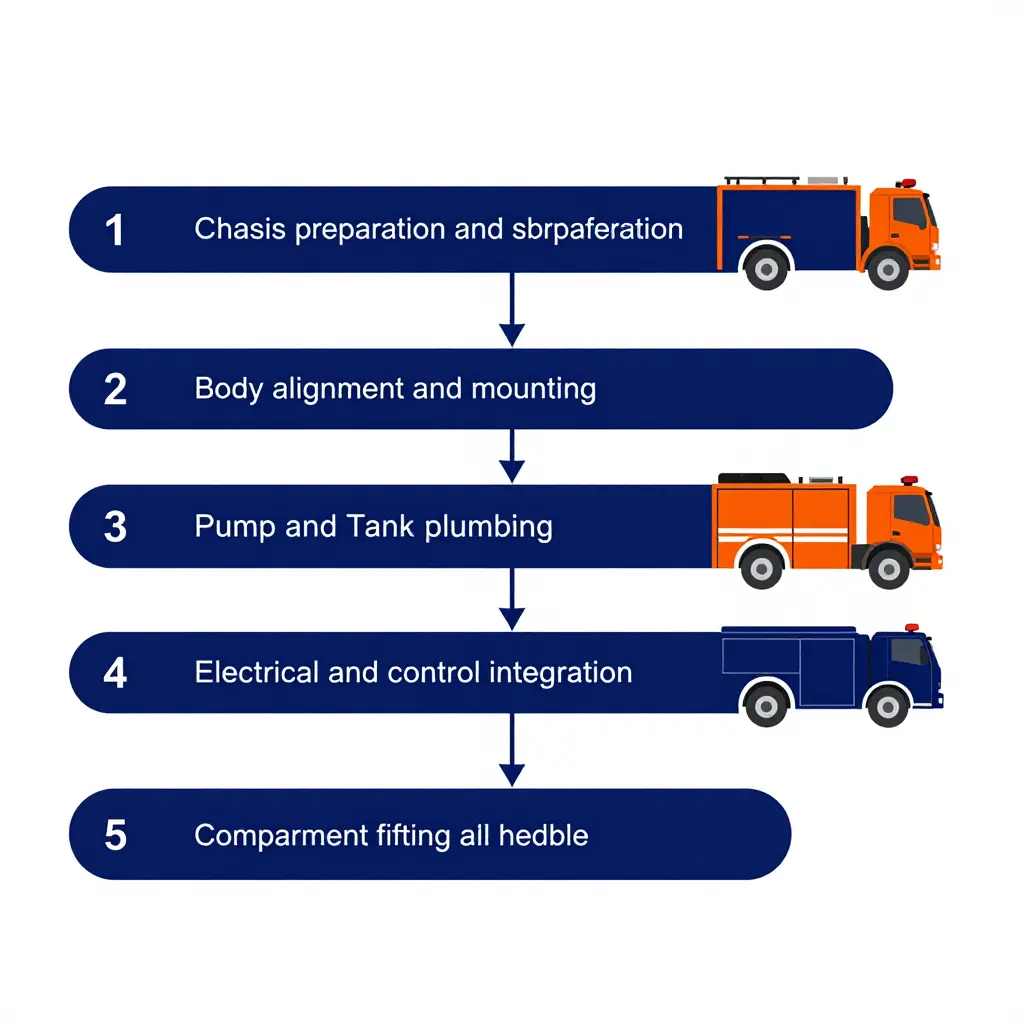
1. Chassis preparation
Nothing bolts straight onto a bare frame. The shop measures rail height and twist, drills new mounting points, and works around whatever the factory hung on the rails. Non-standard wheelbase is the first hour multiplier: change rail length and crossmember spacing, driveshaft geometry and load distribution all move with it, so the subframe gets designed rather than copied.
2. Subframe fabrication
The subframe carries body, tank and pump loads into the chassis and spreads them along the rails. Custom subframe geometry adds cutting, jigging, weld passes and post-weld straightening that a standard pattern never needs, plus a finishing step before anything can be mounted on it.
3. Body alignment, mounting and compartment fit-out
The body goes up, squares to the frame datum lines, gets shimmed until cab-to-body gaps are even, and only then are the mounts torqued. Doors, shelving, trays and hose beds go on once the body is square. Mismatched interfaces are the hidden cost here: when a donated or reused cab does not meet the new body where the drawings said it would, the crew re-drills, re-shims and sometimes rebuilds the rear cab mount. Each correction is a lift cycle, and lift cycles are expensive.
4. Plumbing for pump and tank
Intake, discharge, tank fill, tank-to-pump, drain and foam lines all have to reach from the pump house to the body without trapping air or making the next service call a nightmare. Relocation of the exhaust or fuel system changes the whole routing plan: lines dodge hot components, heat shielding gets added, and the bend count climbs. More bends mean more joints, and every joint is a pressure-test point.
5. Electrical and control integration
Harnesses, multiplex modules, warning lights, scene lighting and pump controls are threaded through the body after fabrication, not before. Compartment layout changes made late force the shop to relocate switch panels and rebuild harness runs that were already terminated. Sensor and gauge placement on a custom body adds programming and bench-testing hours that never appear on the spec sheet.
6. Testing and rework
Hydrostatic testing, pump performance runs, electrical load checks and a road test close the job. Rework caused by earlier interface mismatches tends to surface here, in the most visible and least forgiving part of the schedule.
| Stage | Hours added by | What actually consumes time |
|---|---|---|
| Chassis prep | Non-standard wheelbase, factory hardware | Crossmember layout, drilling, clearance work |
| Subframe fabrication | Custom geometry | Jigging, weld passes, straightening, finishing |
| Body alignment and mounting | Mismatched interfaces, late compartment changes | Lift cycles, shimming, re-drilling, refabricating fit-out |
| Pump and tank plumbing | Exhaust or fuel relocation | Rerouting lines, heat shielding, extra joints and test points |
| Electrical and control | Late layout changes | Harness rebuilds, panel relocation, programming |
| Testing | Rework from earlier stages | Repeat pressure tests, adjustment cycles, re-inspection |
The bottom line for buyers
Engine spec has a ceiling: pick a rating and the cost stops moving. Labor hours have no ceiling, which is why they deserve the most scrutiny. Ask how many hours are booked against each stage, and which assumptions sat behind the number at quote time: wheelbase, subframe design, exhaust and fuel routing, compartment layout. On city and county fleets built on municipal vehicle platforms, that list of assumptions is often the whole difference between two bids. Get that in writing and you can argue with the quotation line by line.
Where the Body Mounting Hours Actually Go
Body mounting runs in six stages, always in the same order, because each one hands a verified measurement or a finished surface to the next. When a quote for a pumper or a municipal truck body comes back higher than another bid on an identical chassis, the money is usually parked in one of them.
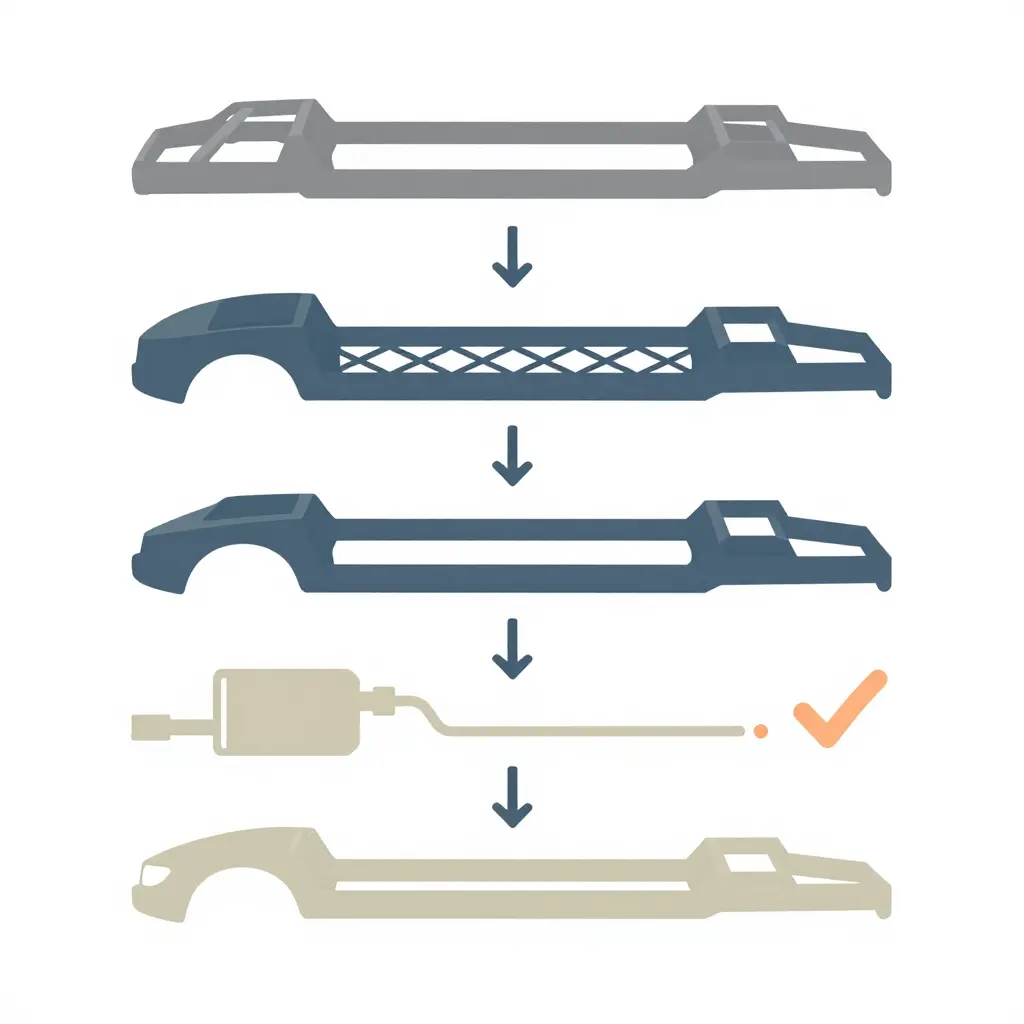
The diagram shows order rather than detail, because the order is what sets the ceiling on what the later stages can cost.
Stage 1: Chassis preparation
Before anything bolts on, the frame is cleaned, measured and drilled. A cab-over usually means a shorter wheelbase and a tighter working envelope behind the cab, so access for drilling and torquing takes longer. Rail thickness, flitch plates and any factory-installed fuel or air tanks decide how much relocation gets billed.
Stage 2: Subframe fabrication
The subframe carries the body load and spreads it along the rails. A flat subframe over a straight frame is quick. Add a pump module, a water tank, a ladder rack and a boom, and it becomes a custom weldment with its own drawings, jig time and finishing.
Stage 3: Body alignment and mounting
Alignment is measure, shim, re-measure. The body goes down, squares to the chassis centerline, gets checked for cab-to-body clearance, and the mounts are torqued last. Rework here is expensive because everything downstream inherits the error: a body sitting 10 mm off reappears as a misaligned pump driveline or a harness that will not reach.
Stage 4: Pump and plumbing integration
Plumbing surprises first-time buyers. Pump mounting, driveline or PTO alignment, suction and discharge runs, valve placement, tank fill and drain lines, primer and drain valves: each connection is cut, fitted, pressure-tested and documented. Stainless or rigid pipe takes longer than hose, and a tight compartment takes longer than an open one.
Stage 5: Electrical and control wiring
Harnesses, chassis interface modules, warning lights, scene lighting, pump panel controls and telemetry all land here. The hours depend less on circuit count than on routing quality: loomed, labeled and grommeted runs cost more up front and less during warranty.
Stage 6: Testing
Finally the truck runs. Pump performance is verified against its rating, plumbing is checked for leaks under pressure, electrical loads are confirmed, and the body is inspected for clearance and fastener torque. A build with thin documentation often pays for that here, in repeat testing.
What actually drives the labor estimate
| Stage | Main labor driver | Quote risk if underestimated |
|---|---|---|
| Chassis preparation | Frame access, tank and bracket relocation | Medium: hidden rework |
| Subframe fabrication | Custom weldment complexity, finishing | High: fabrication runs long |
| Body alignment and mounting | Squaring, shimming, mount torque sequence | High: pushes every later stage |
| Pump and plumbing integration | Pipe material, valve count, compartment density | Very high: pressure testing repeats |
| Electrical and control wiring | Routing quality, labeling, integration modules | Medium: warranty callback cost |
| Testing | Documentation completeness, first-pass quality | Low, but multiplies everything above |
Why this matters when you compare quotes
Two bids can share chassis, engine and tank size and still differ by a margin no hardware list explains, because the difference sits in stages two through five. Ask for hours by stage and a schedule that names the milestones. A builder who can show where the hours go has usually built the truck on paper before cutting steel.
Buyers comparing cab-over and conventional quotes will find these line items in every body mounting estimate for municipal truck bodies:
- Subframe fabrication and welding: custom rail spacing adds cutting, jig setup and weld passes.
- Chassis frame drilling and reinforcement: each new hole and plate adds layout and inspection time.
- Wheelbase modification: cutting or extending rails pulls in driveline and brake line rework.
- Exhaust and fuel system relocation: routing around the body adds brackets, hangers and heat shielding.
- Pump and PTO driveline alignment: angle and runout tolerances add shimming and repeat checks.
- Plumbing and valve installation: each valve bank adds fittings, pressure testing and leak checks.
- Electrical harness routing and control panel wiring: longer runs and extra circuits add termination time.
- Compartment and shelving fit-out: custom layouts add measuring, cutting and fastener work.
- Corrosion protection and paint touch-up: drilled frames and welded seams add prep and re-coating.
- Factory acceptance testing: pump, electrical and road tests take scheduled hours before delivery.
Each line is quoted in hours, so one deviation in frame layout or body length can move the total before anyone mentions the engine.
Where Engine Spec Does and Does Not Change the Price
Most first-time buyers treat the engine as the big money question. More power, bigger number on the invoice. In practice engine spec is a secondary lever, because the powertrain is the best-documented and most standardized part of the build. The uncertainty sits downstream, in the hours a crew spends making a body fit the chassis it landed on.
The predictable half: catalog pricing
Engine, transmission and emissions configuration are priced from manufacturer data books. Dealers and body builders work from the same published tables, so a change in rating, torque band or aftertreatment package converts into a clean, quotable increment. Take that number to a finance committee and you can defend it line by line, because nothing is being estimated. It is being looked up.
Where the labor ripple stays small
If the engine and driveline arrive as the chassis was designed around them, mounting follows the usual sequence: same bracket set, same torque values, same crew, same hours. A different badge on the valve cover adds no shop time by itself. Two trucks with noticeably different ratings can land within a narrow band of each other once the chassis is configured properly.
Four paths where engine choice leaks into labor
The exceptions are worth understanding before you sign.
- PTO compatibility. A power take-off taps engine power to run a pump or other equipment. If the chosen engine and transmission do not offer a clean take-off interface, the shop fabricates a workaround, and fabrication is billed by the hour.
- Cooling package space. Bigger engines need bigger radiators and fans. When that package grows into space the body was meant to occupy, brackets and panels get redesigned on the shop floor.
- Exhaust routing. Exhaust and aftertreatment paths vary by engine family. A route that conflicts with body structure means custom hangers, heat shielding and clearance checks.
- Accessory drive availability. Alternators, compressors and hydraulic pumps need a mounting point and a belt to turn them. Missing drive points become custom brackets.
Notice what the four have in common: the engine did not simply cost more, it changed geometry, and geometry is what crews charge for.
Predictable increments versus unpredictable hours
| What changes | How it appears in the quote | How predictable it is |
|---|---|---|
| Engine, transmission, emissions rating | A named line item from the chassis data book | Highly predictable |
| Driveline or frame rail changes | Added chassis content plus reworked mounting points | Fairly predictable |
| Cooling package re-fit | Extra brackets, hose routing, shop time | Hard to quote upfront |
| Exhaust routing conflict | Custom hangers, shielding, clearance checks | Hard to quote upfront |
| PTO or accessory drive mismatch | Re-engineered drive, added fabrication hours | Hard to quote upfront |
Keeping the estimate honest
Ask for engine spec as a priced line item, and ask separately what integration hours the builder assumed. With both numbers visible, you can tell a genuine specification upgrade from an assumption that moved quietly. It helps to see the same combinations across municipal vehicle configurations, because layout decisions made early decide whether the powertrain stays a catalog figure or turns into a fabrication project.
The lever that moves a fire truck price least predictably is rarely the one under the hood.
Where the Money Actually Sits: Labor vs. Engine
Buyers fixate on the chassis (horsepower, torque, badge, cab style) because that is the number quoted in conversation. Break a quotation into five blocks and the chassis stops looking like the center of gravity.
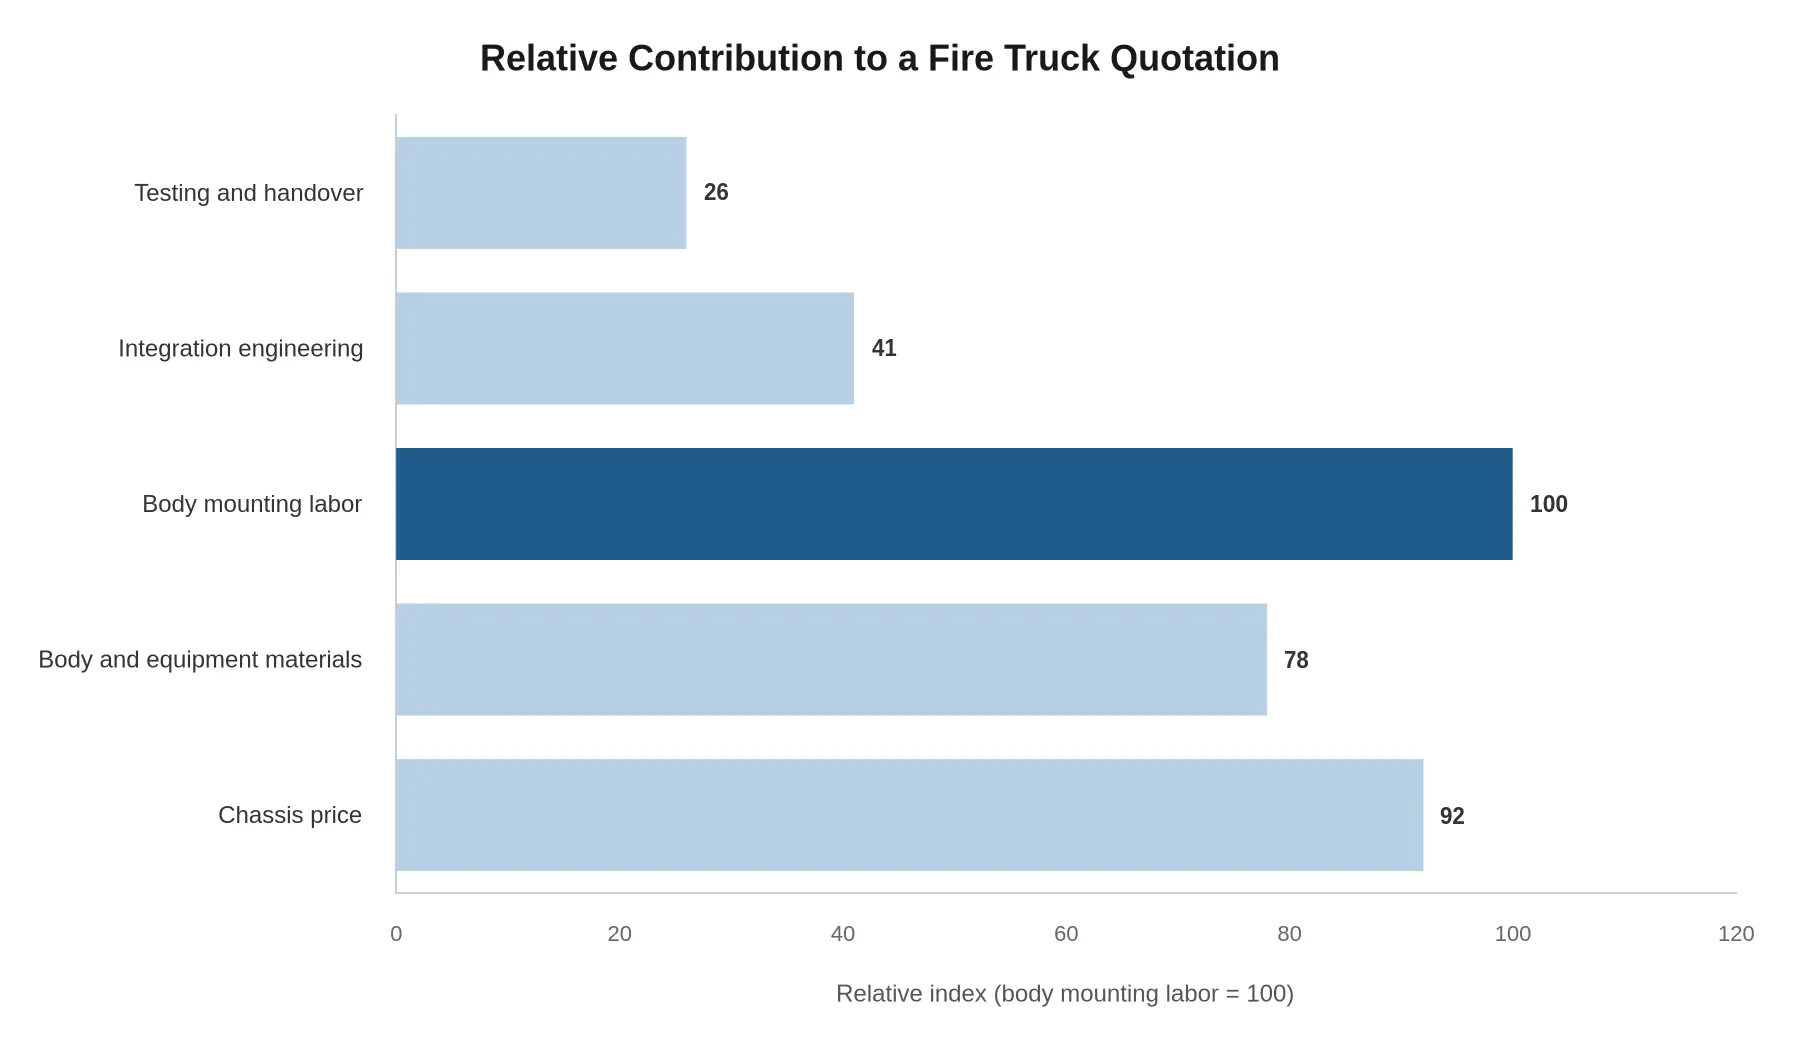
Figure: Relative contribution of five cost blocks within a typical fire truck quotation. Values are relative index indicators used only for comparison (body mounting labor = 100), not absolute currency figures and not a price list.
Chassis price sits at 92 on the index: substantial, but not the biggest line. Body and equipment materials come in at 78. Body mounting labor, the bar in the darker shade, tops the chart at 100.
Integration engineering (41) and testing and handover (26) look modest on their own, yet they are driven almost entirely by how the body meets the chassis: pump plumbing routing, PTO interfaces, wiring looms, brake and stability re-certification. Those hours scale with fit-up difficulty, not with displacement.
Turn the index into shares and the argument gets blunt. Body mounting labor is about 30 percent of the quotation, and with integration engineering and testing added, labor approaches half. A cab-over and a conventional chassis can carry near-identical engines and still land tens of thousands apart, because everything downstream of the frame rails answers to chassis geometry: cutting, mounting, plumbing, wiring, commissioning, sign-off. Engine spec can move the chassis block by a few points. Mounting labor moves the total.
If the fleet also runs road-cleaning or solid-waste units alongside municipal fire and emergency vehicles, ask for the same five-block breakdown on every unit. Repeated build logic is where labor savings compound.
How to Read a Fire Truck Quotation Line by Line
A fire truck quotation is often a two-page summary hiding a twelve-page story. The bottom line says what you will pay; the line items say why. Buyers who read the lines rather than the total are the ones who find the lump sums nobody explained.
Split the quote into five cost blocks
Mark up the document before comparing anything. Chassis cost (cab, engine, drivetrain, delivery), materials (body steel or aluminum, tank, pump, compartments, hardware), body mounting labor, engineering (design hours, drawings, third-party review), and testing (pre-delivery inspection, pump test, road test, certification). If a vendor cannot place every dollar into one of those five buckets, the quote is not finished.
Compare hours, not just totals
A bid that comes in $30,000 cheaper may simply have budgeted 200 fewer body mounting hours; if shop time bills at $150 an hour, that is the whole gap. The hours do not vanish. They come back as change orders after the cab is cut. Ask every bidder for the same number in the same unit: straight-time hours per stage.
Watch for vague entries. “Miscellaneous mounting,” “shop supplies,” “integration allowance” and lump-sum “systems integration” fees are where padding hides. A legitimate line has a quantity, a unit and a rate.
Five steps for reviewing a bid
- Block the five cost categories and total each one separately.
- Request labor hours by stage: chassis prep, subframe fabrication, body set, plumbing and wiring, finish, and testing.
- Flag every line missing a quantity, unit or hour count, and ask for it in writing.
- Re-spec both bids to one common body configuration before comparing money.
- Re-price the top two quotes using your own conservative hour assumption.
Weighting cab-over and conventional bids fairly
When body specifications differ, compare the difference rather than the total. A cab-over with a raised roof and short wheelbase squeezes compartments and hose bed layout differently than a conventional chassis with a long nose. Normalize for compartment cubic feet, tank capacity, pump access, hose bed length and mounting hardware, then convert each gap into materials plus hours. Only then does the fire truck price mean anything. If you are still scoping configurations, municipal vehicle builds show how body layouts drive labor.
Ask one blunt question at the end: “Show me the hours.” A vendor who can answer in detail is usually the one whose quote survives contact with the shop floor.
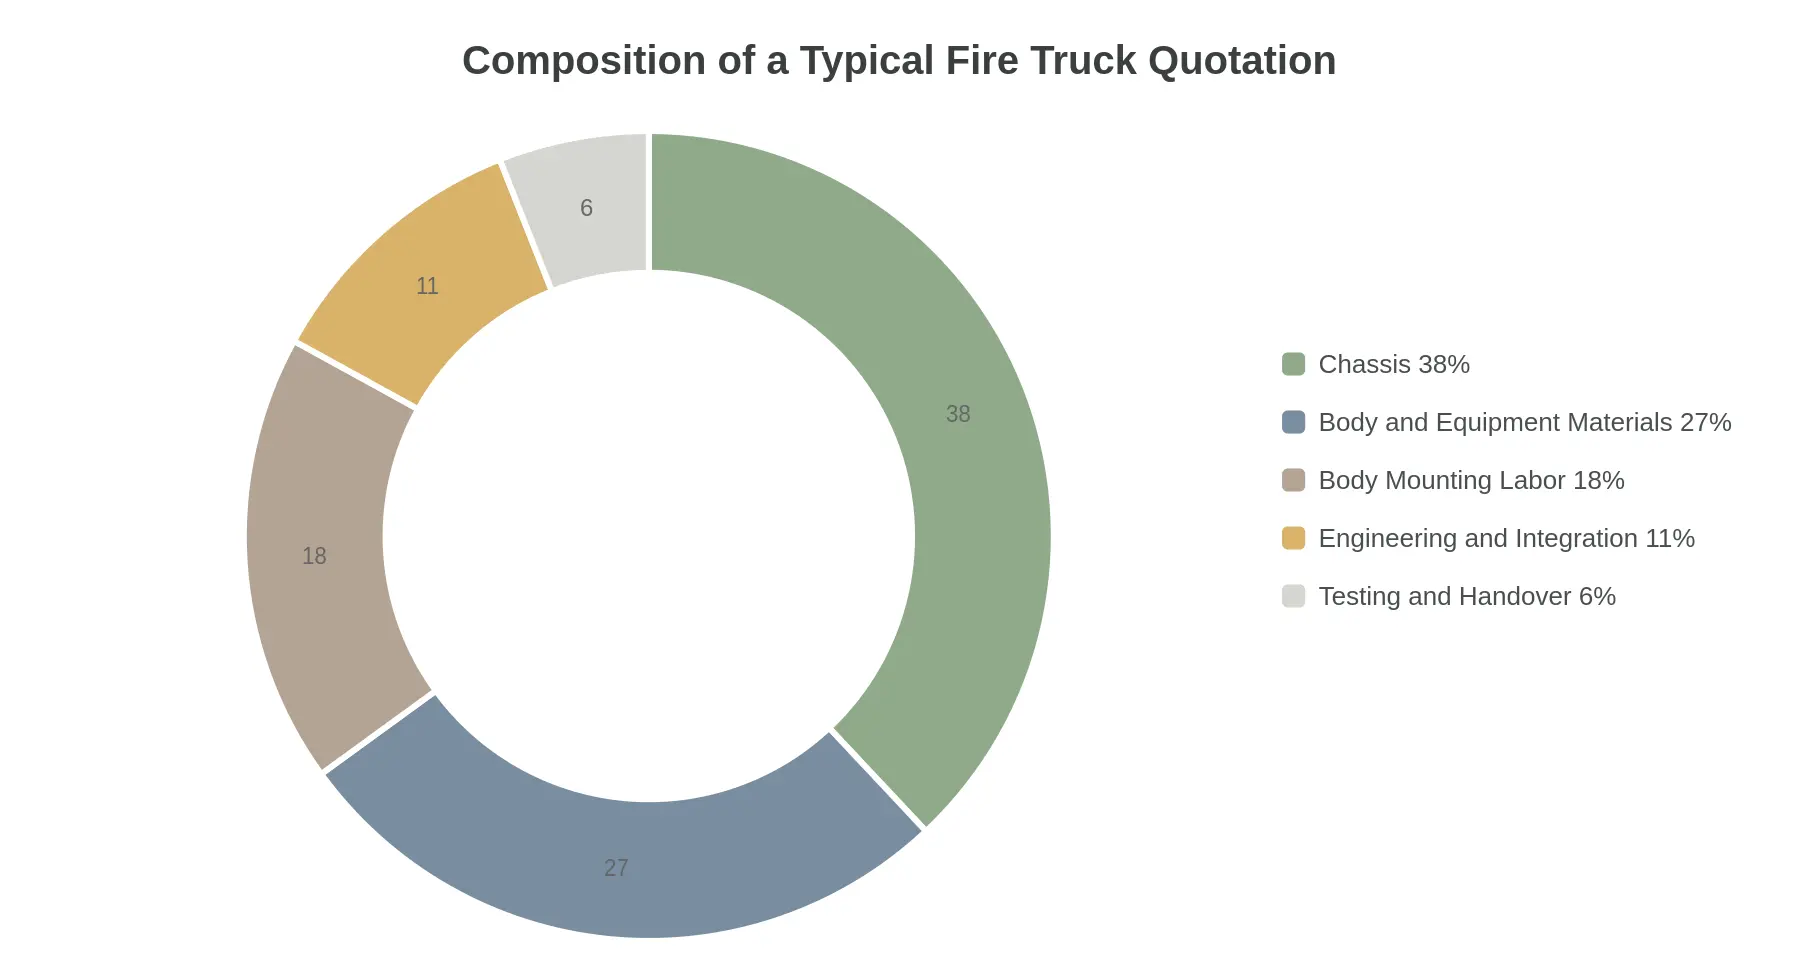
Figure: Composition of a typical fire truck quotation. Labor and integration combined (body mounting labor plus engineering and integration) usually outweigh the engine-driven chassis increment, which is why two quotes for the same cab-over or conventional chassis can still land far apart. Segment proportions vary with body complexity, so treat this split as a starting point for your own bid comparison rather than a fixed rule.
What Business Owners Should Specify Before Requesting Bids
Bids for the same class of vehicle can come back far apart, and the split is rarely the engine. It is how much fabrication and fitting the body supplier priced in. Take that ambiguity out of the request.
Fix the body specification first
Write the body down before you talk to anyone about chassis. At minimum: body length and width, steel versus aluminum, tank or compartment capacities, pump location and drive type, number of compartments, equipment mounting points, lighting and warning packages, and provisions for foam, generators or winches. A clear body specification settles your fire truck price more than any debate about horsepower, because it tells every bidder how much material and shop time the job takes.
Lock the wheelbase and compartment layout
Wheelbase drives cab-to-axle distance, axle loading, tank placement, and whether a standard body can be adapted or a custom one built. Give bidders the exact wheelbase, CA dimension, frame rail width, rail section height and any rear overhang limits. Then lock the compartment layout with a drawing rather than a verbal description. With the layout fixed, fabricators quote from the same plan instead of guessing, and you stop paying for assumptions as change orders. Buyers evaluating municipal chassis and body platforms can usually get those dimensions from the supplier before the bid stage.
Request labor hours by stage
Ask each bidder to break labor into stages: chassis preparation, subframe fabrication, body mounting, plumbing, electrical, paint, and testing and commissioning. Insist on hours, not lump sums. Body mounting labor is typically the largest labor line and swings sharply between cab-over and conventional layouts, so a staged breakdown makes the difference visible and comparable. It also gives you a baseline for judging any mid-project variation request.
Compare bids on equal specifications
Once specifications are fixed, comparison becomes arithmetic rather than negotiation. Build a checklist, confirm every bidder priced the same scope, then flag exclusions, assumptions and allowances. For reference values on chassis frame and subframe mounting references, manufacturer documentation is a useful cross-check on supplier claims.
| Item to lock | What to state |
|---|---|
| Body | Length, width, material, compartment count |
| Chassis interface | Wheelbase, CA dimension, rail width and height |
| Layout | Sealed drawing with equipment locations |
| Labor | Hours per stage, not lump sums |
| Scope | Exclusions, allowances, testing responsibility |
For supply-side context: this site is published by CRRC Vehicles, which lists fire-rescue, municipal, tank, crane-lifting and cargo chassis categories. Treat published specifications from any manufacturer as a starting point and confirm the numbers that affect your own build.
Frequently Asked Questions
Does a cab-over chassis always cost less than a conventional chassis?
Not automatically. The bare cab-over chassis often prices lower, because flat frame rails and a compact cab reduce material and shorten the wheelbase, but the gap closes when a conventional chassis is ordered in volume with a widely used powertrain. It can also reverse once you count the extra fitting work a cab-over needs: cab tilt clearance, frame adapters, and a subframe that clears the cab. The fire truck price depends on the mounted result, not the chassis label.
How much of a fire truck price is labor?
Body mounting labor alone runs about 30 percent of the quotation, and close to half once integration engineering and testing hours are added. Most of it is concentrated after the chassis arrives: mounting, plumbing, wiring, pump alignment and compartment finishing. The chassis line is easy to compare between bidders. The labor line is where quotes quietly diverge.
Does a larger engine specification raise the quotation significantly?
Usually not. Engine and transmission upgrades appear as defined lines on the specification sheet, and they move the total by a small percentage. A change in wheelbase, cab configuration or body mounting labor shifts the number far more than a step up in displacement.
Why can two quotes for the same body size differ so much?
Because body volume is one cost driver among several. Chassis wheelbase and cab type, tank and pump specification, compartment layout, steel versus aluminum, and the number of custom brackets each change the build. When one builder reuses a validated mounting kit and another fabricates from scratch, mounting hours alone can separate the two bids by a wide margin.
How can we reduce body mounting labor hours without cutting equipment?
Standardize the interface between body and chassis instead of removing gear. Specify pre-punched frame rails, a pre-engineered subframe validated for one chassis model, modular wiring harnesses and consistent wheelbases across the fleet. Pre-assembling compartments, plumbing and pump modules off-chassis shortens the hours spent on the frame, and repeating the same configuration across units compounds the saving. Fleets comparing municipal vehicle builds on a standard platform can check mounting assumptions line by line before signing.
Summary of What Drives the Fire Truck Price
Across cab-over and conventional designs, the order of influence holds. Layout decides what a builder can fit and where; body mounting labor turns those limits into hours on the floor; engine spec, visible on every sheet, is the most predictable and least influential part of the quote.
Three things to carry into bid comparison:
- Compare layout before price: cab type, wheelbase and frame rail dimensions. Those constraints drive the labor behind the number.
- Ask for mounting labor as hours by task (fabrication, mounting, plumbing, wiring, testing), not a lump sum.
- Use engine ratings as a like-for-like check: confirm displacement, torque and emissions tier match, then set them aside and weigh labor and layout instead.
For how these chassis decisions play out in municipal chassis platforms, the build details explain more than the engine badge.